

Photo by Susan Holt Simpson on Unsplash
Development Toolbox
As we begin our development journey, we will be using several tools throughout the process. This article will introduce you to them. Anyone who has done any Java development knows the headache of manually installing and managing multiple versions of Java.
SDKMAN eases this headache by providing a single command-line tool to install and manage all of your Java versions. In addition to Java, SDKMan supports a comprehensive selection of other JVM-based languages and tools, including Spring Boot, Maven, Gradle, Groovy, Kotlin, Scala, Vert.x, and Micronaut.
Anyone who has done any Java development knows the headache of manually installing and managing multiple versions of Java.
SDKMAN eases this headache by providing a single command-line tool to install and manage all of your Java versions. In addition to Java, SDKMan supports a comprehensive selection of other JVM-based languages and tools, including Spring Boot, Maven, Gradle, Groovy, Kotlin, Scala, Vert.x, and Micronaut.
Please refer to the installation page to install SDKMan in your local environment.
Java platform
We will be using Java 8 to build and run our services, and we will use SDKMan to install it. SDKMan provides a comprehensive selection of JDK vendors and versions to choose from. To list the available vendors and versions use the command:sdk list java
You should see a listing similar to this one:
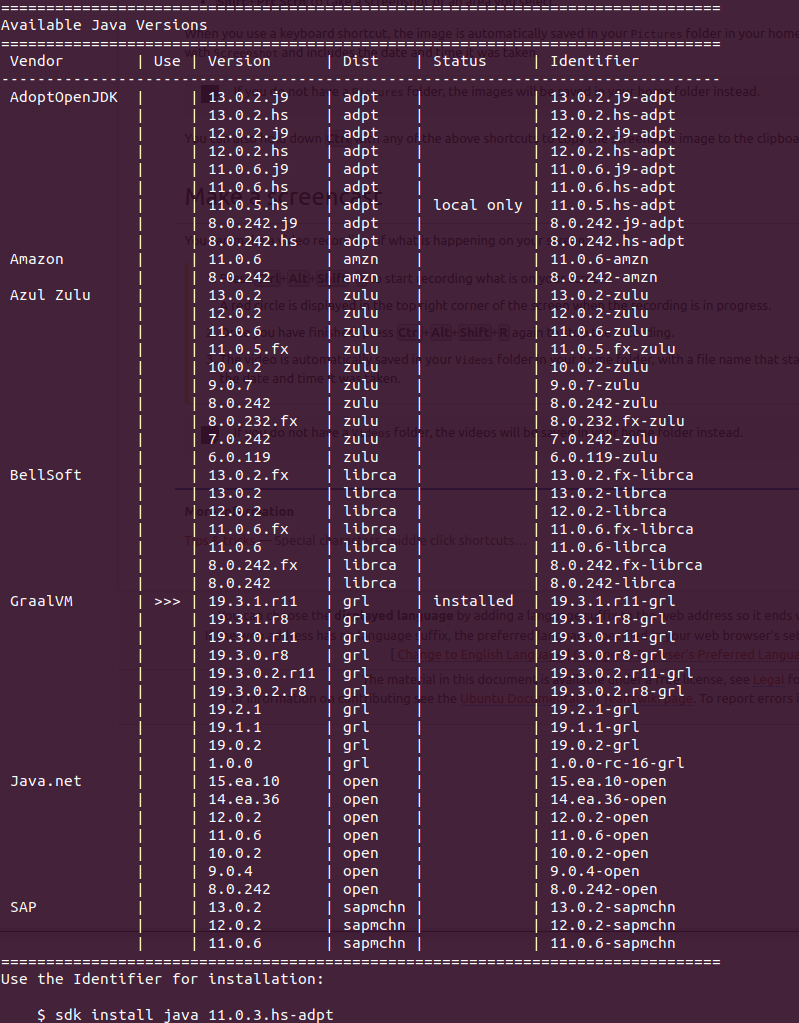
We will be targeting Java 8, so install the vendor identifier for the Java 8 install you prefer.
sdk install java 8.0.242-openThis will install Java.net version 8.0.242-open
Build Automation
Build automation is the process of automating the creation of a software build and the associated processes, including compiling computer source code into binary code, packaging binary code, and running automated tests.
—Wikipedia
—Wikipedia
In the Java world, the two dominant build automation tools are Maven and Gradle.
In addition to Maven's basic functionality, It provides a plugin model that allows Maven's functionality to be extended. These plugin's are defined within a project's pom.xml allowing each project to customize Maven for its specific requirements.
The reference implementation uses Maven to compile, package, and generate the docker container image that will be used to deploy each service instance.
We will use SDKMan to install an instance of Maven.
sdk install maven
Project Lombok
A common criticism levied against the Java language centers around the language's perceived verbosity. The more code you have to write, the more you have to read when trying to understand and troubleshoot. Project Lombok is a support library that eliminates some of the most common boilerplate code through the use of Java's Annotation mechanism. By merely adding annotations to classes, fields, and methods, Lombok can automatically generate the necessary boilerplate code at compile time. This approach reduces the source code footprint making the application significantly easier to read.The following list contains the most commonly used Lombok annotations used by the reference implementation's services.
@Slf4j
We will use this annotation to generate the Slfj logger reference in each service class.
@Data
This annotation simplifies classes that represent a data model object. These can be database entities or data transfer objects. The @Data is actually a shortcut that replaces five other Lombok annotations
- @RequiredArgsConstructor- automatically generates a constructor with 1 parameter for each field that requires special handling.
- @Getter/@Setter - automatically generates accessor and mutator methods for any field.
- @ToString- automatically generates a toString() method that returns the class name with each field name and value separated by commas.
- @EqualsAndHashCode- automatically generates both equals(Object other) and hashcode() methods/
@Builder
This annotation automatically implements the Builder Pattern to allow object instances to be created in using a fluent interface approach. The Builder annotation allows object instances to be composed in the following manner:
    EmailMessage message = EmailMessage.builder()
    .body(body)
    .destinationAddress(destinationEmail)
    .subject("Account created")
    .build();
   <dependency>
   <groupId>org.projectlombok</groupId>
   <artifactId>lombok</artifactId>
   <version>1.18.8</version>
   <dependency>
 &
SpringFox
&
SpringFox
The REST API defines the service's public interface; therefore, it is important that it must be documented. Documentation becomes critically important when the service consumer is not the service creator. A properly documented API that is up to date with the deployed service is critical to avoiding confusion.
But who wants to maintain a REST API's documentation manually? It is a thankless job that often gets lost in the shuffle with a dynamically changing service interface. To prevent the documentation from becoming outdated, we will turn to Swagger and SpringFox.
Swagger (A.K.A. OpenAPI) allows a REST API to be defined using JSON or YAML metadata. It also provides a web UI that renders the metadata into human-readable HTML documentation. Additionally, The same metadata that renders the HTML documentation can also render a REST client, which can be used to exercise each REST endpoint and display the call response. What is not to love about that? You can still use tools like CURL, Httpie, or Postman to exercise your endpoints if you prefer to spend a lot of time typing, but it's nice to have an up-to-date, dynamically generated REST client in your toolbelt as well.
So how will we be generating our Swagger metadata? We will be using the SpringFox library. SpringFox provides Swagger integration for the Spring Framework through the use of a comprehensive set of annotations that decorate our REST controllers. To use the SpringFox library, we simply add the following dependencies to our project:
   <dependency>
   <groupId>io.springfox</groupId>
   <artifactId>springfox-swagger-2</artifactId>
   <version>2.8.0</version>
   <dependency>

   <dependency>
   <groupId>io.springfox</groupId>
   <artifactId>springfox-swagger-ui</artifactId>
   <version>2.8.0</version>
   <dependency>
These dependencies provide annotation processing and UI generation. The following demonstrates how we annotate a Spring-boot service configuration class to support swagger. For a comprehensive example, refer to Springfox Spring MVC and Spring Boot documentation.
   pen the template in the editor.
   */
   package com.thinkmicroservices.ri.spring.account.profile;

   import org.springframework.context.annotation.Bean;
   import org.springframework.context.annotation.Configuration;
   import org.springframework.context.annotation.Profile;
   import springfox.documentation.builders.ApiInfoBuilder;
   import springfox.documentation.builders.RequestHandlerSelectors;
   import springfox.documentation.service.ApiInfo;
   import springfox.documentation.spi.DocumentationType;
   import springfox.documentation.spring.web.plugins.Docket;
   import springfox.documentation.swagger2.annotations.EnableSwagger2;

   // We use spring profiles to enable this swagger configuration. The configuration  class will only
   // exist if we are running the service with the 'swagger' profile
   @Profile(value = {"swagger"})

   // identify this class as a spring configuration class
   @Configuration

   // enable swagger 2.
   @EnableSwagger2
   public class SwaggerConfiguration {

   // Here we instruct swagger where we want to start looking for endpoints.
   // all packages and classes below the base package will be scanned for SpringFox Swagger annotations
   @Bean
   public Docket productApi() {

   return new Docket(DocumentationType.SWAGGER_2)
   .select()
   .apis(RequestHandlerSelectors.basePackage("com.thinkmicroservices.ri.spring.account.profile.controller"))
   .build().apiInfo(apiEndpointInfo());

 }

 // Here provide the API endpoint metadata information
 private ApiInfo apiEndpointInfo() {
 return new ApiInfoBuilder().title("Account Profile REST API")
 .description("provides access to account profile facilities")
 .license("Apache 2.0")
 .licenseUrl("http://www.apache.org/licenses/LICENSE-2.0.html")
 .version("1.0.0")
 .build();
}
}
Now that the application knows where to search for annotations, we provide it with a controller that has been annotated. The following controller class method demonstrates basic REST method annotation:
  @RequestMapping(value = "/account/{id}", method = {RequestMethod.GET})
  @ResponseBody

  // swagger metadata
  @ApiOperation(value = "View a profile", response = Profile.class)
  // swagger metadata
  @ApiImplicitParams({
  @ApiImplicitParam(name = "Authorization", value = "Authorization token",
  required = true, dataType = "string", paramType = "header")})

  public ResponseEntity

    findByAccountId(@PathVariable("id") String accountID, HttpServletRequest httpServletRequest) {

   // ...

 }

We have discussed Docker in the previous articles on containers and container orchestration. We reintroduce you to Docker as each of the reference implementation services will be packaged as a Docker container image with our build automation tool. The generated Docker image provides a local instance of the container image. Additionally, pre-built container images for each of the services will be published to Docker-Hub so that the service containers can be pulled directly from the cloud without having to build it.
Docker Installation
Rather than reprint the installation instruction for the Docker Engine, we will point you to Docker's own installation documentation.
Docker-Compose
We could manually start each of our service containers, which is both tedious and error-prone. Alternatively, we could dive into full-blown orchestration with Docker Swarm or Kubernetes. Unfortunately, both of these tools have non-trivial learning curves. Instead, we will crawl before we sprint. We will begin managing our application's service containers using Docker-Compose. Docker-Compose is a simple tool for defining and running multi-container Docker applications.
Docker-Compose Installation
Again, rather than reprint the installation instruction for Docker-Compose, we will point you to Docker's own installation documention.
With Docker-Compose, we will use a YAML file to describe the application’s service configuration.
  ## define the version of Docker-Compose we will be using
  version: "3.1"

  # define our services

  services:

  ## RABBIT MQ Messaging
  rabbitmq:
  image: rabbitmq:3.5.3-management
  ports:
  - 15672:15672
  - 5672:5672
  networks:
  - rpc_network

  ## RPC SERVER
  rpcserver:
  image: thinkmicroservices/rpcserver
  networks:
  - rpc_network
  environment:
  - spring.rabbitmq.host=rabbitmq
  - spring.rabbitmq.port=5672
  depends_on:
  - rabbitmq

  ## RPC CLIENT
  rpcclient:
  image: thinkmicroservices/rpcclient
  networks:
  - rpc_network
  ports:
  - 8080:8080

  environment:
  - spring.rabbitmq.host=rabbitmq
  - spring.rabbitmq.port=5672
  depends_on:
  - rabbitmq

  networks:
  rpc_network:
In this example, we describe an application consisting of three container services:
- rabbitmq- this configures an instance of rabbitmq message broker.
- rpcserver- this configures an instance of an rpc server. This container depends on the rabbitmq container and won't start until the dependency has started.
- rpcclient- this configures an instance of an rpc client app. This container depends on the rabbitmq container and won't start until the dependency has started.
Once we have described our application's configuration, we can simply call docker-compose up method to start the application or docker-compose down to shut our services down. Docker-Compose will ease us into the world of containerized applications without much ceremony.
 Fluentd
The reference implementation will be using a unified logging approach to aggregate each service's log in an Elasticsearch database. To do this, we will be using leveraging fluentd to act as our log event transport. We will be using Docker-Compose's support for fluentd by configuring each of our service containers logging drivers. In the following example, we demonstrate how our configuration service is configured to redirect its stdout to fluentd.
 #########################
 # configuration service #
 #########################

 config-service:
 image: thinkmicroservices/configuration-service:latest

 environment:
 - nothing
 networks:
 - spring_ri_network
 ports:
 - 8888:8888

 ## we link to our fluentd configuration

 links:
 - fluentd

 ## configure the logging to redirect stdout to the fluentd driver
 ## and point the fluentd driver our elasticsearch location.
 ## tag all the events with 'configuration.svc'

 logging:
 driver: "fluentd"
 options:
 fluentd-address: localhost:24224
 tag:  configuration.svc

Micrometer provides a vendor neutral API, dimensional-first metrics collection facade included with Spring Boot 2's Actutator. We will use it in conjunction with a Prometheus endpoint to provide time, count, and gauge metrics.
Micrometer allows us to add service-specific metric capture to each of our services through a simple API. To enable Micrometer and Prometheus, we start by adding the following dependencies:
  <dependency>
       <groupId>org.springframework.boot</groupId>
       <artifactId>spring-boot-starter-actuator</artifactId>
  </dependency>

  <dependency>
       <groupId>io.micrometer</groupId>
       <artifactId>micrometer-core</artifactId>
  </dependency>

  <dependency>
       <groupId>io.micrometer</groupId>
       <artifactId>micrometer-registry-prometheus</artifactId>
  </dependency>
< Then we add the following to our application.yml to enable the Prometheus actuator endpoint:
  management:
    endpoints:
      web:
        exposure:
          include: prometheus
In general, we will be capturing metrics in the @Service components. However, you can capture metrics anywhere by following these four steps:
- Autowiring an instance of MeterRegistry into the target class. The MeterRegistry
- Declare the metrics as field variables in the class.
- Initialize the metrics you want to capture. We generally do this in a @PostConstruct method.
- Invoke the metric variables method you want to capture.
import io.micrometer.core.instrument.MeterRegistry;
import org.springframework.stereotype.Service;

@Service
public class ArbitraryService {

    @Autowired
    private MeterRegistry meterRegistry;

    // declare a counter metric. This metric
    // will count the number of times the inoke method
    // is called.
    private Counter invocationCounter;


    @PostConstruct
    private void initializeMetrics() {
      // use Counter's fluent api to build the metric
      invocationCounter = Counter.builder("arbitrary.service.invoked")
                         .description("The number of calls to the 'invoke' method.")
                         .register(meterRegistry);
    }

    /**
    * This is where the magic happens.
    **/

    public void invoke(){
      // here we increment the counter
      invocationCounter.increment();
    }
  }
}
Now when the ArbitraryService's invoke method is called, the counter is incremented and reflected in calls to the service's /actuator/prometheus endpoint. In addition to simple counters, Micrometer also support other metric primitives including: Timer, Counter, Gauge, DistributionSummary, LongTaskTimer, FunctionCounter, FunctionTimer, and TimeGauge. For more information, check out the Micrometer Concepts page.
Containers are Awesome, and the Docker Engine CLI provides a robust suite of operations to manage your containers. Unfortunately, not everybody enjoys working with a command-line interface. For those users, we suggest Portainer. Portainer is a lightweight, open-source, browser-based, container management UI for Docker. It provides comprehensive management of Docker images, containers, networks, volumes, hosts, events, and stacks.
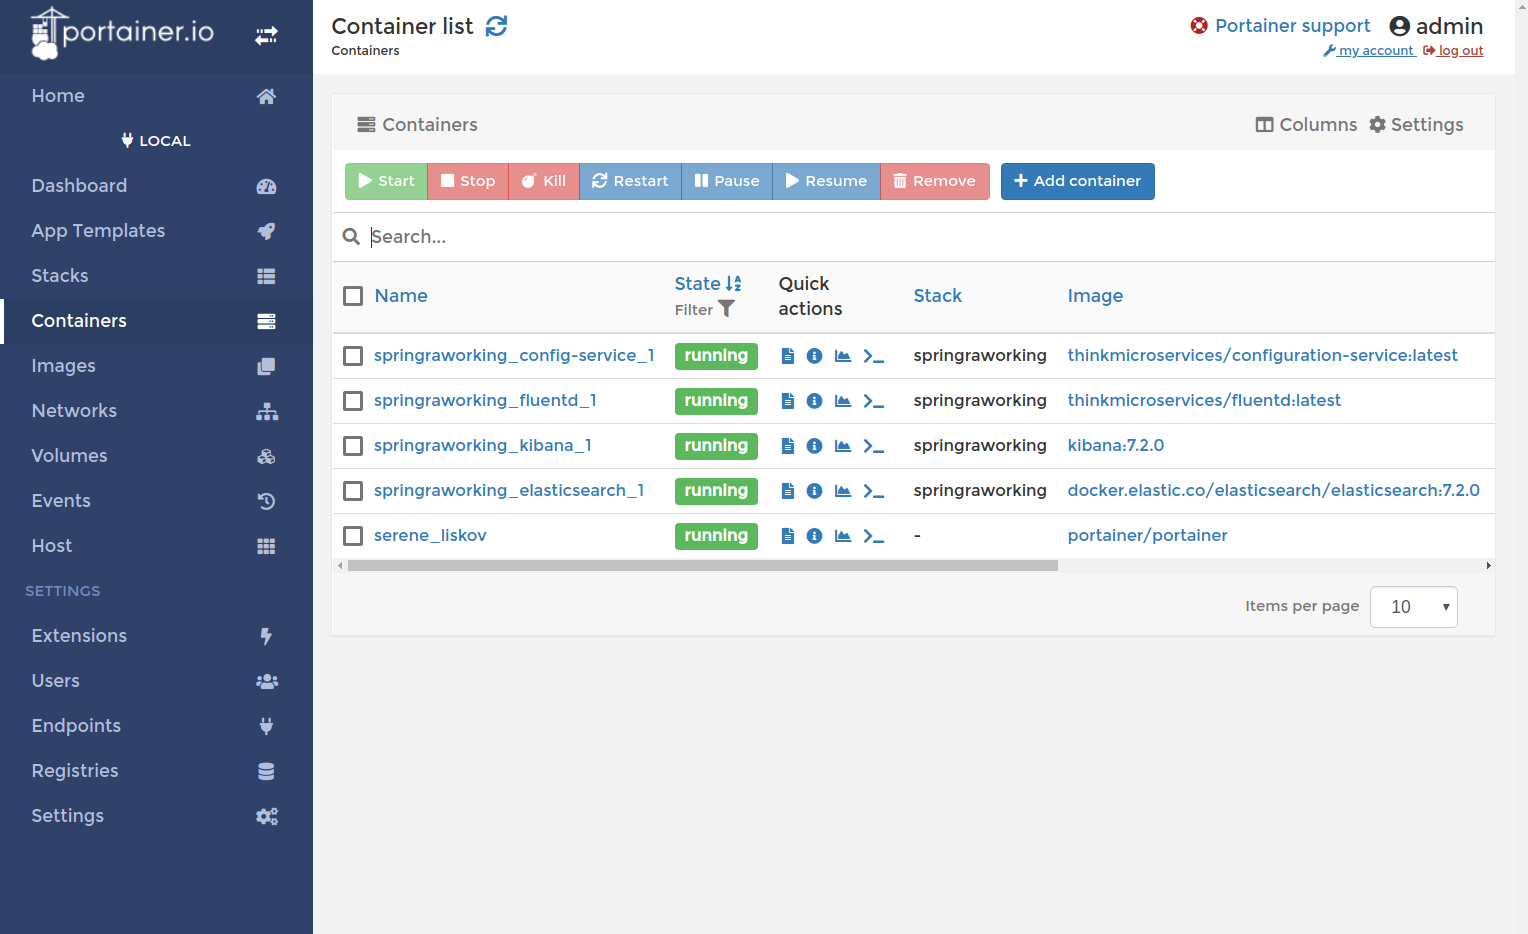
Installation
Not only does Portainer manager your containers, it is installed as a container. This makes installation as simple as:
docker volume create portainer_data
docker run -d -p 8000:8000 -p 9000:9000 --name=portainer --restart=always -v /var/run/docker.sock:/var/run/docker.sock -v portainer_data:/data portainer/portainer
If you prefer a web-based container manager over the CLI, Portainer may be what you are looking for.

Twitter
Facebook
Reddit
LinkedIn
Email