

NATS As eVENT tRIGGER
In the previous two articles, we discussed NATS messaging, its message streaming progeny JetStream, and how we can use it to communicate between services. We will finish our discussion of NATS with this mercifully shorter article in which we will use NATS messages to trigger OpenFaaS functions using the OpenFaaS NATS Connector.OpenFAAS Event Connector Pattern
The most common way to trigger an OpenFaaS function is via HTTP/webhooks. However, OpenFaas provides an Event-connector pattern to allow third-party development of custom code to invoke functions.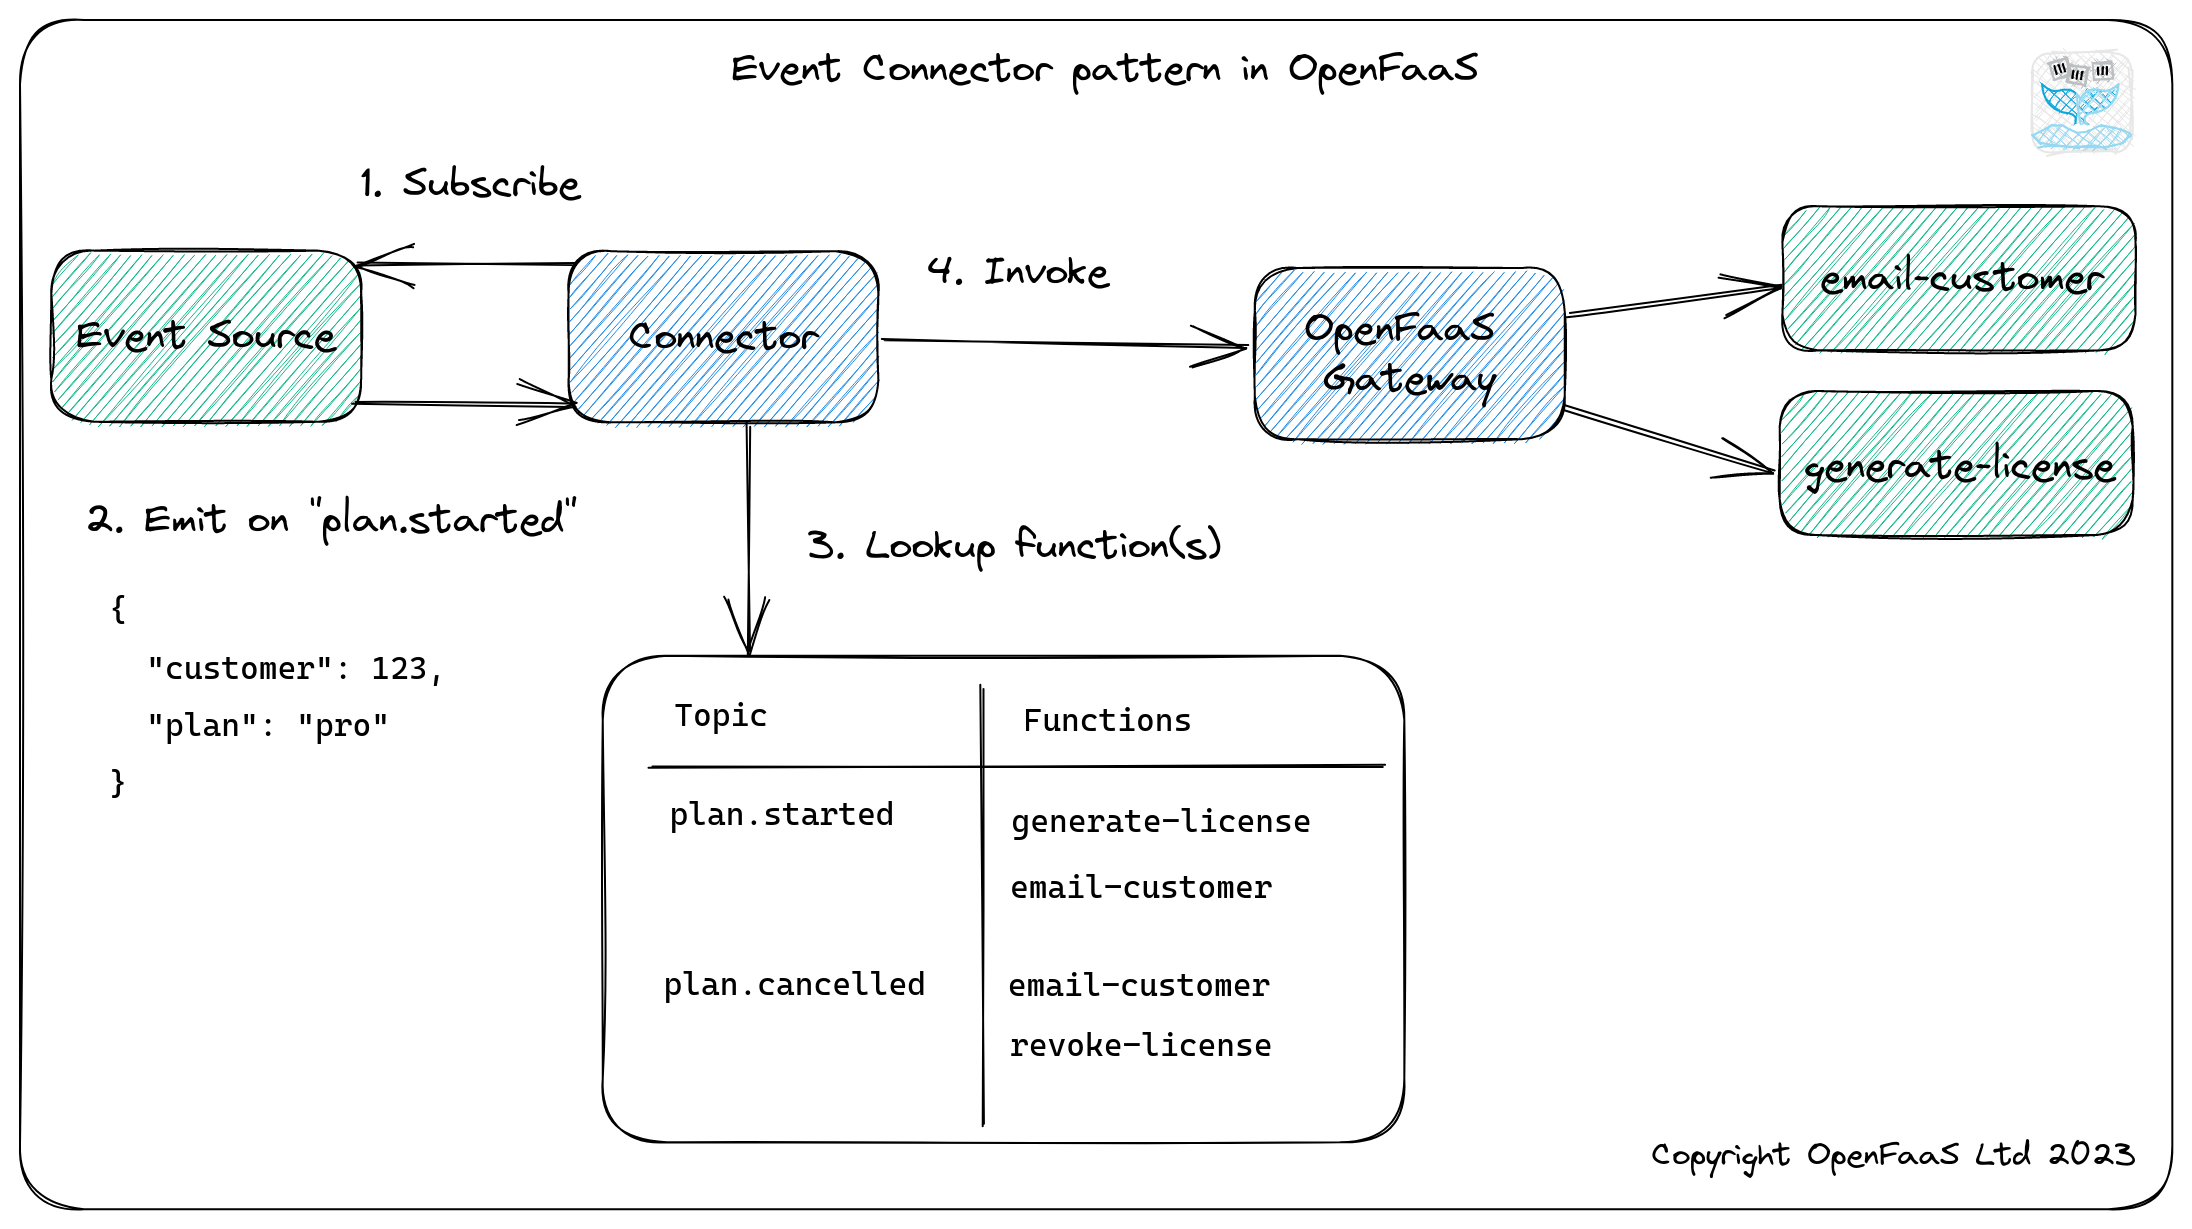
Currently, OpenFaaS has support for several additional integrations, including Cron, MQTT, AWS SQS, and of course, NATS. When no existing integration is available, OpenFaaS provides the Connector SDK to simplify creating custom integrations.
NATS Connector
In this article, we are exclusively interested in the NATS Connector. Unsurprisingly, this connector allows us to trigger OpenFaaS functions when a NATS message is published to a given topic.Setting up the Environment
We will be using the OpenFaaS instance we deployed in the article Microservices, Functions-as-a-service, and Kubernetes. This instance is deployed to a local MicroK8S Kubernetes node. It is strongly recommended that you deploy OpenFaaS according to that article, as this article's instructions are predicated on it.With OpenFaaS deployed to our MicroK8S node, we will use the faas-cli tool to deploy two test functions: receive-message and publish-message, which are provided by the NATS connector. The receive-message function is triggered when a message arrives at the designated NATS topic. The publish-message will publish a message to the designated NATS topic when it is triggered.
We must, of course, also deploy the NATS-connector. We accomplish this by deploying it to the same Kubernetes openfaas namespace where we originally deployed our OpenFaaS instance.
Verify our OpenFaas Instance
Before we get started, let's verify that OpenFaaS is running on our MicroK8S instance by getting its gateway address. :
microk8s kubectl get svc -n openfaas gateway-external -o wide
The output should appear similar to:
Terminal
gateway-external NodePort 10.152.183.45 <none> 8080:31112/TCP 46h app=gateway
From this output, we can see that our gateway address is 10.152.183.45:8080.
Let's also retrieve our OpenFaaS password. We can do that with the following command::
PASSWORD=$(microk8s kubectl -n openfaas get secret basic-auth -o jsonpath="{.data.basic-auth-password}" | base64 --decode) && \ echo "OpenFaaS admin password: $PASSWORD"
Your output should be similar to:
OpenFaaS admin password:
atDHpyHle9tN
With our gateway address and password, we can now log in to OpenFaaS.
Log in to OPenFaas
Let's start by setting the OPENFAAS_URL to our gateway address with the following command:
export OPENFAAS_URL=<
gateway address>
Now we will log in to OpenFaaS using the faas-cli and the password we retrieved (If you don't have the faas-cli installed, please refer to the instructions in the article Microservices, Functions-as-a-service, and Kubernetes). Login with the following command:
faas-cli login -g $OPENFAAS_URL -u admin --password <
password>
Your output should appear similar to:
WARNING! Using --password is insecure, consider using: cat ~/faas_pass.txt | faas-cli login -u user --password-stdin Calling the OpenFaaS server to validate the credentials... WARNING! Communication is not secure, please consider using HTTPS. Letsencrypt.org offers free SSL/TLS certificates. credentials saved for admin http://10.152.183.45:8080
We can ignore the password WARNING for now.
We can obtain a listing of all our deployed functions with the following command:
faas-cli list
If you have a fresh install with no functions deployed, your output should appear similar to:
Function Invocations Replicas
The listing should be empty.
Deployment
Our first step is to deploy the receive-message function. This function will be triggered by the NATS connector when a NATS message arrives. Here we see the function's handler (written in GO):
loading...
The handler receives the message body and echoes its contents to the function's log.
We can deploy the receive-message function with the following command:
faas-cli deploy --name receive-message --image openfaas/receive-message:latest --fprocess='./handler' --annotation topic="nats-test"
The output should be similar to:
Terminal
WARNING! Communication is not secure, please consider using HTTPS. Letsencrypt.org offers free SSL/TLS certificates.

Deployed. 202 Accepted.
URL: http://10.152.183.45:8080/function/receive-message
If we request the function listing again, you should see:
Terminal
Function                        Invocations     Replicas
receive-message                 0               1
Now we need to deploy the NATS connector to MicroK8S. We will do this using the following deployment YAML:
loading...
We can apply this with the following command:
microk8s kubectl apply -f https://raw.githubusercontent.com/openfaas/nats-connector/master/yaml/kubernetes/connector-dep.yaml
If everything went correctly, your output should be similar to:
deployment.apps/nats-connector created
We can verify it deployed correctly by retrieving the list of deployments in the openfaas namespace. We can do this with the following command:
microk8s kubectl get deployments -n openfaas
The output should include the nats-connector:
Terminal
NAME                READY   UP-TO-DATE   AVAILABLE   AGE
nats                1/1     1            1           1h
basic-auth-plugin   1/1     1            1           1h
queue-worker        1/1     1            1           1h
prometheus          1/1     1            1           1h
gateway             1/1     1            1           1h
alertmanager        1/1     1            1           1h
nats-connector      1/1     1            1           1m22s
With the NATS-Connector deployed, let's deploy the publish-message function. Let's take a look at this function (also written in GO):
loading...
Here we see the function connects to NATS and publishes its request body to the nats-test subject.
We can deploy the function with the following command:
faas-cli deploy --name publish-message --image openfaas/publish-message:latest --fprocess='./handler' --env nats_url=nats://nats.openfaas:4222
The output should appear similar to:
WARNING! Communication is not secure, please consider using HTTPS. Letsencrypt.org offers free SSL/TLS certificates. Deployed. 202 Accepted. URL: http://10.152.183.45:8080/function/publish-message
Let's verify both functions have been deployed by listing our functions:
faas-cli list
If we request the function listing again, you should see:
Terminal
Function                        Invocations     Replicas
receive-message                 0               1
publish-message                 0               1
With the NATS-Connector and two test functions deployed, we are now ready to test our setup.
Testing The NATS connector
We will test out the NATS connector by invoking the publish-message function from the faas-cli:
faas-cli invoke publish-message <<< "nats connector message test"
This command will call the publish-message with the string "nats connector message test". Once the function handler completes, the message will be published to the NATS topic. Once published, the NATS Connector will receive the message and trigger the receive-function message.
We can't directly see the function triggered, but we can view the logs of the receive-message function with the faas-cli. To view the log, we invoke the following command:
faas-cli logs receive-message
Your log output should look similar to the following.
Terminal
2021-08-10T16:22:07Z 2021/08/10 16:22:07 received "nats connector message test"
Here we see that our receive-message function was triggered with the message string that the publish-message function published.
Configuring the NATS Connector
In this article, we have used the NATS Connector default configuration. However, you will likely want to configure it to suit the needs of your application. To change the configuration, update the appropriate container environment variables in the connector-dep.yaml deployment file and re-apply it with kubectl.| Variable | Description | Default |
|---|---|---|
topics |
Delimited list of topics | nats-test, |
broker_host |
The host, but not the port for NATS | nats |
async-invocation |
Queue the invocation with the built-in OpenFaaS queue-worker and return immediately | false |
gateway_url |
The URL for the OpenFaaS gateway | http://gateway:8080 |
upstream_timeout |
Timeout to wait for synchronous invocations | 60s |
rebuild_interval |
Interval at which to rebuild the map of topics <> functions | 5s |
topic_delimiter |
Used to separate items in topics variable |
, |

Twitter
Facebook
Reddit
LinkedIn
Email