
Introduction
In the previous article, we started implementing our OutboundEmailService. In this article we will finish it by building our application's external API which consists of a REST controller and Message Queue Listener. We will update our Docker-Compose file to include our new service, and we will exercise our REST endpoint with our dynamically generated Swagger UI web client, and exercise our Message Queue Listener by publishing messages to the service's message queue using RabbitMQ web administration console.Requirements
Before you get started, you will need the following:- Java
- Maven
- Docker
- Docker-Compose
External API
The service uses two mechanisms to provide service to its consumers. The first, uses Spring Controllers to expose an HTTP-based endpoint interface. This allows us to build our REST endpoints. The second, uses a Message Queue Listener that waits for messages to appear in a designated message queue, retrieves the message, and processes them.Spring Controllers
We expose our external endpoints using Spring Controllers. This service contains two services: the DisableSwaggerController and the OutboundEmailControllerDisableSwaggerController This controller exists to intercept calls to eh the services's /swagger-ui.html page. If the application is run with the swagger profile being set, the ./swagger-ui.html page will return the Swagger interface. When the swagger profile is missing, the controller will return an HTTP 404 - NOT FOUND response.
loading...Here we:
- declare the class annotation @Profile("!swagger") to instruct the framework that this controller should only run when the swagger profile is not set
- declare the class annotation @Controller indicating that we want to expose an http feature.
- declare the method annotation @RequestMapping(value = "swagger-ui.html", method = RequestMethod.GET to instruct the framework that we want to map calls from swagger-ui.html to this method.
This controller provides the actual REST endpoint methods we wish to expose as the service's API.
loading...Here we:
- declare the class annotation @RestController to instruct the framework that we want to expose this class as a REST endpoint
- @Autowire the OutboundEmailClientService into the controller.
- declare the method annotation @RequestMapping(value = "/sendEmail", method = {RequestMethod.POST}) mapping this method to the path /sendMail with the http verb POST.
- declare the method annotation @ApiOperation(value = "sendEmailWithAttachment", response = List.class) as part of the service's Swagger annotations.
- declare the method annotation @ApiResponses( ... ) as part of the service's Swagger documentations.
Message Queue Listener
In addition to the REST endpoint, the OutboundEmailService also supports a message-driven interface that provides an alternate mechanism for invoking the service. In the earlier article, Message-driven microservices, we discussed the use of message queues to provide message transport between services. Message queues allow us to temporally decouple the caller from the target service. This is often necessary when the service must integrate with a slower dependent service.Asynchronous functions such as email messaging are natural candidates for this approach. By decoupling the caller from its target we derive three primary benefits:
- Responsiveness- the caller is more responsive since it no longer must wait for a response from the target service.
- Temporally Adaptive- In situations where the target service may be long-running, a caller can enqueue messages at a rate independent of the rate the target service could process the request.
- Scalability- In situations where the volume of messages would outpace the ability of a single slower service, we can scale the slower service by provisioning multiple instances in parallel to process the queue load.
loading...Here we see:
- The class annotation @EnableBinding(Sink.class) which assigns this listener to the queue identified in the service's application.yml
- The methood annotation @StreamListener(target = Sink.INPUT, condition = "headers['type']=='EMAIL_NO_ATTACHMENT'") which routes queue messages with the header type EMAIL_NO_ATTACHMENT to the processEmailMessage(...) method for processing.
- The methood annotation @StreamListener(target = Sink.INPUT, condition = "headers['type']=='EMAIL_WITH_ATTACHMENT'") which routes queue messages with the header type EMAIL_WITH_ATTACHMENT to the processEmailMessageWithAttachment(...) method for processing.
Docker-Compose
We continue the process of extending our previous Docker-Compose file:loading...We have added the following:
- RabbitMQ service configured on port 5672 and its web administration service on port 15672
- OutboundEmailService is configured on port 6010 with dev & swagger as the active profiles
Outbound Email Service in action
We can copy the Docker-Compose file above to your local machine and run it from the command prompt:docker-compose -f ./dc-04-outbound-email.yml up -d
exercising the swagger interface
Once the all the services have started we can navigate to http://localhost:6010/swagger-ui.html.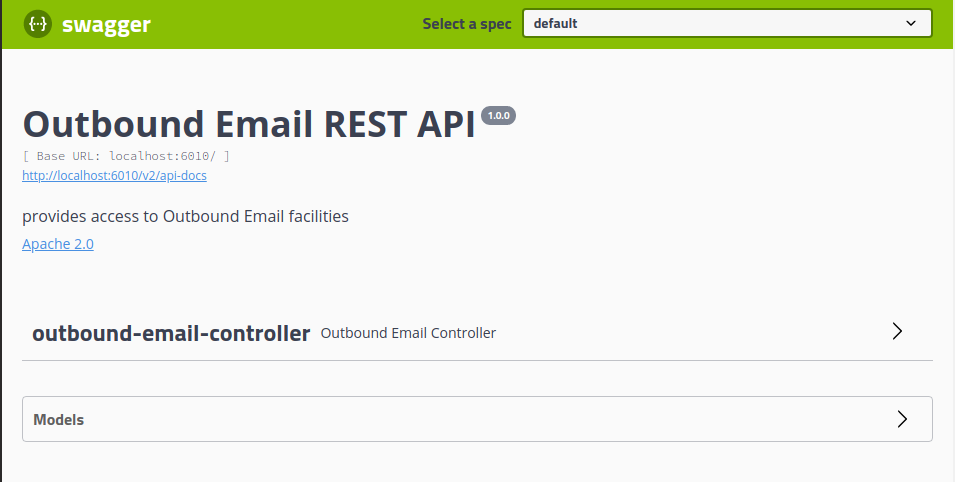
Here we see the Outbound Email REST API Swagger landing page. The page displays the outbound-email-controller and the models used by the endpoint. If we click on the Models option:
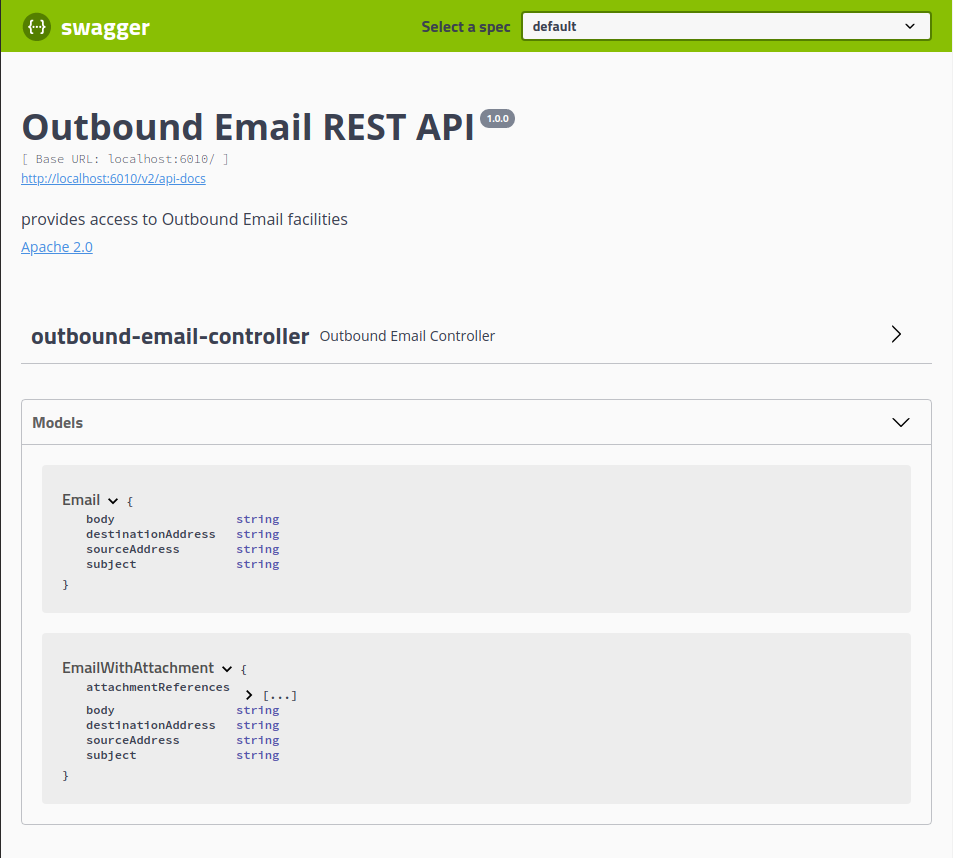
We see the two models used by the endpoint. If we collapse the Models option and click on the outbound-email-controller option:
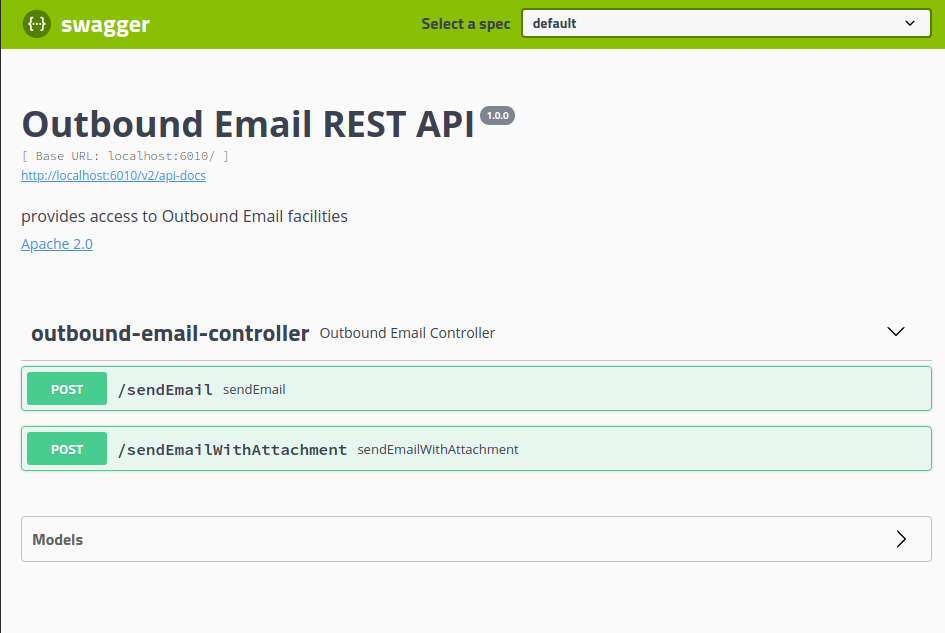
We see the two methods exposed by the service endpoint /sendMail & sendMailWithAttachment. We can exercise a method by clicking on the desired option. We will click on the /sendEmail option which will expose the methods parameters:
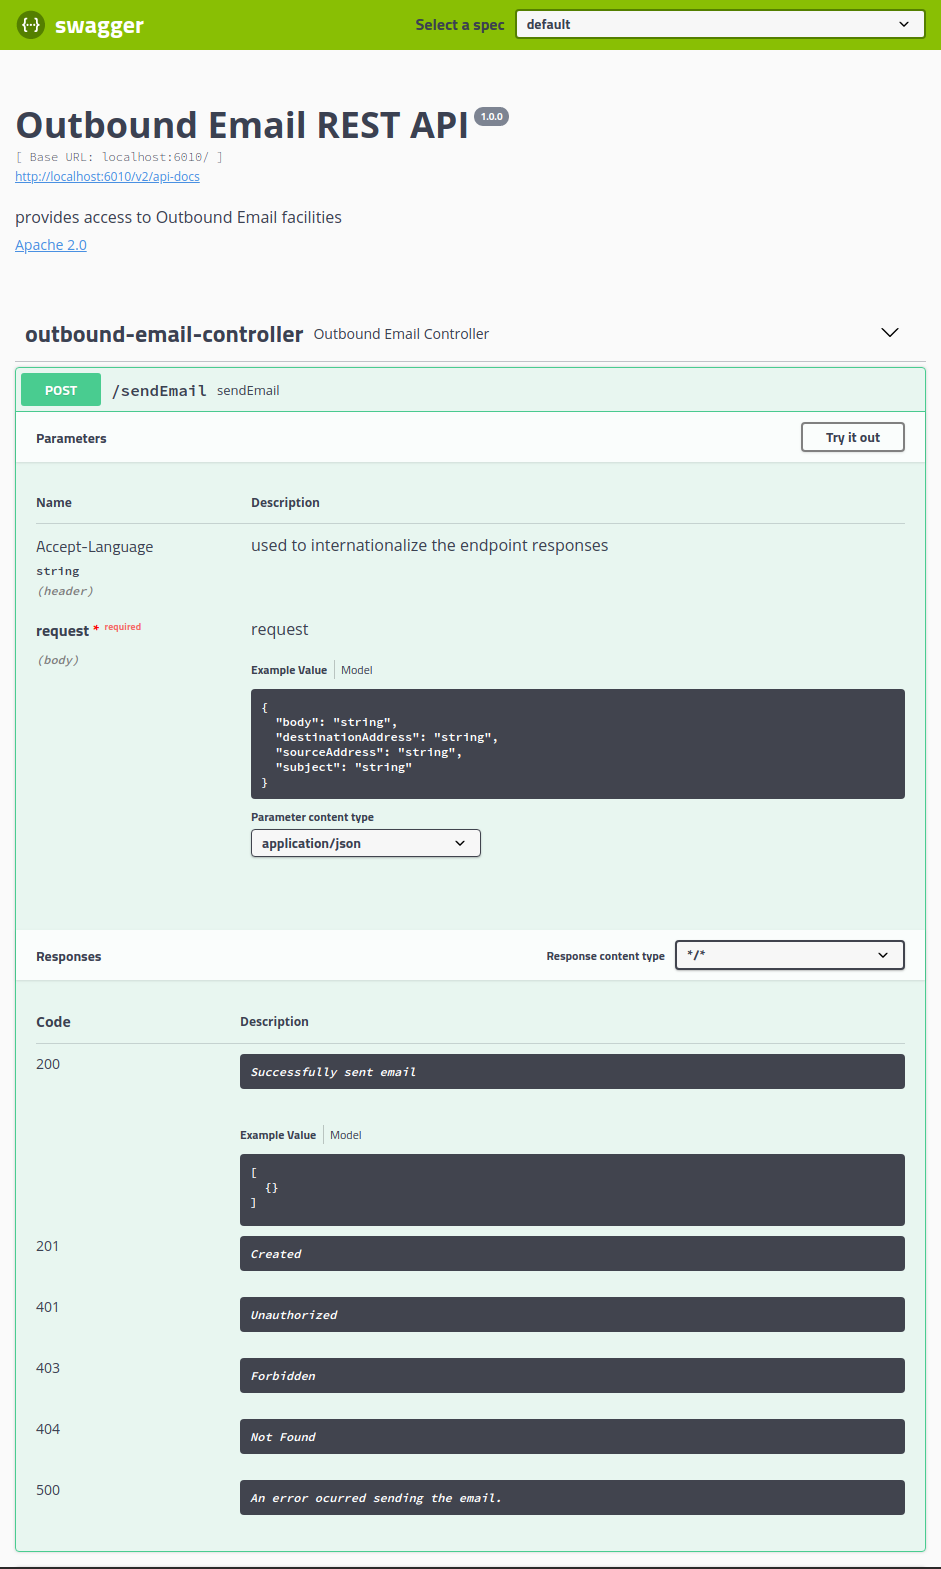
We see the method accepts two parameters-
- Accept-Language- this is an optional parameter that we can pass to instruct the service's I18N resolver to internationalize the service's error response. This field will set the request's Accept-Language header value. If no value is set, or the value is not a supported language code, the service will respond with its default values.
- Request- This parameter is the JSON representation of the request model.
We can also see the potential response codes supported by the service. If we collapse that method and click on /sendEmailWithAttachment we will see:
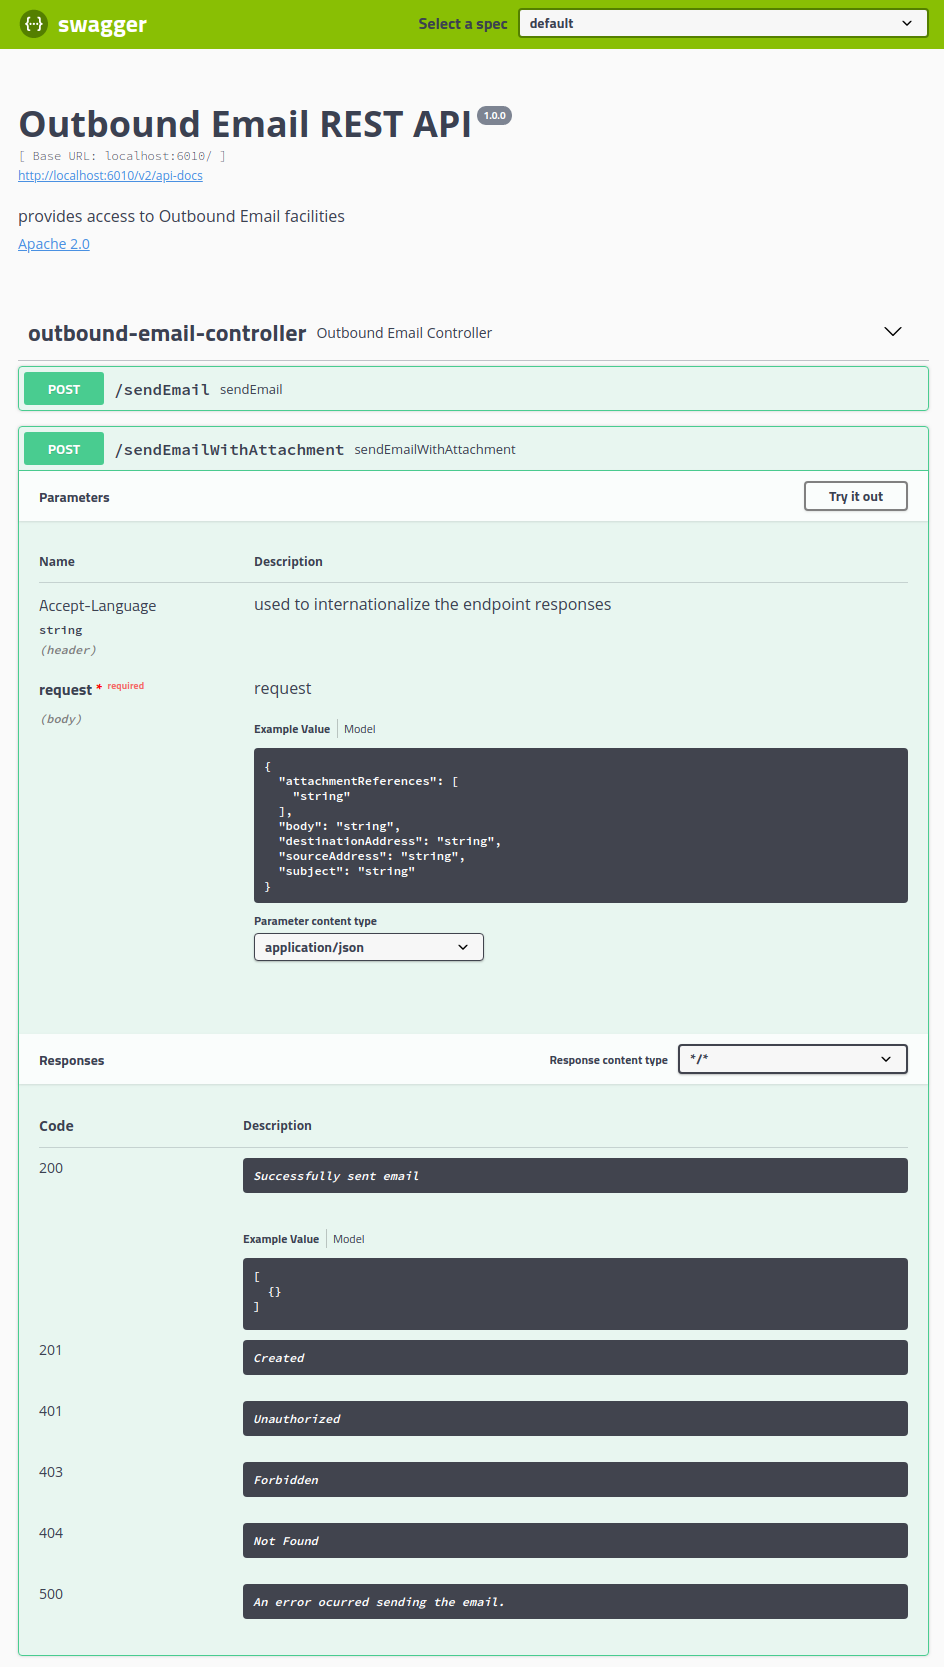
As expected it looks almost identical to the first method except it contains a different email request model.
If we want to exercise the service's /sendEmail method, we can collapse the method and click the /sendEmail option again. Then click the Try it out button at the top of the parameter list. This will display:
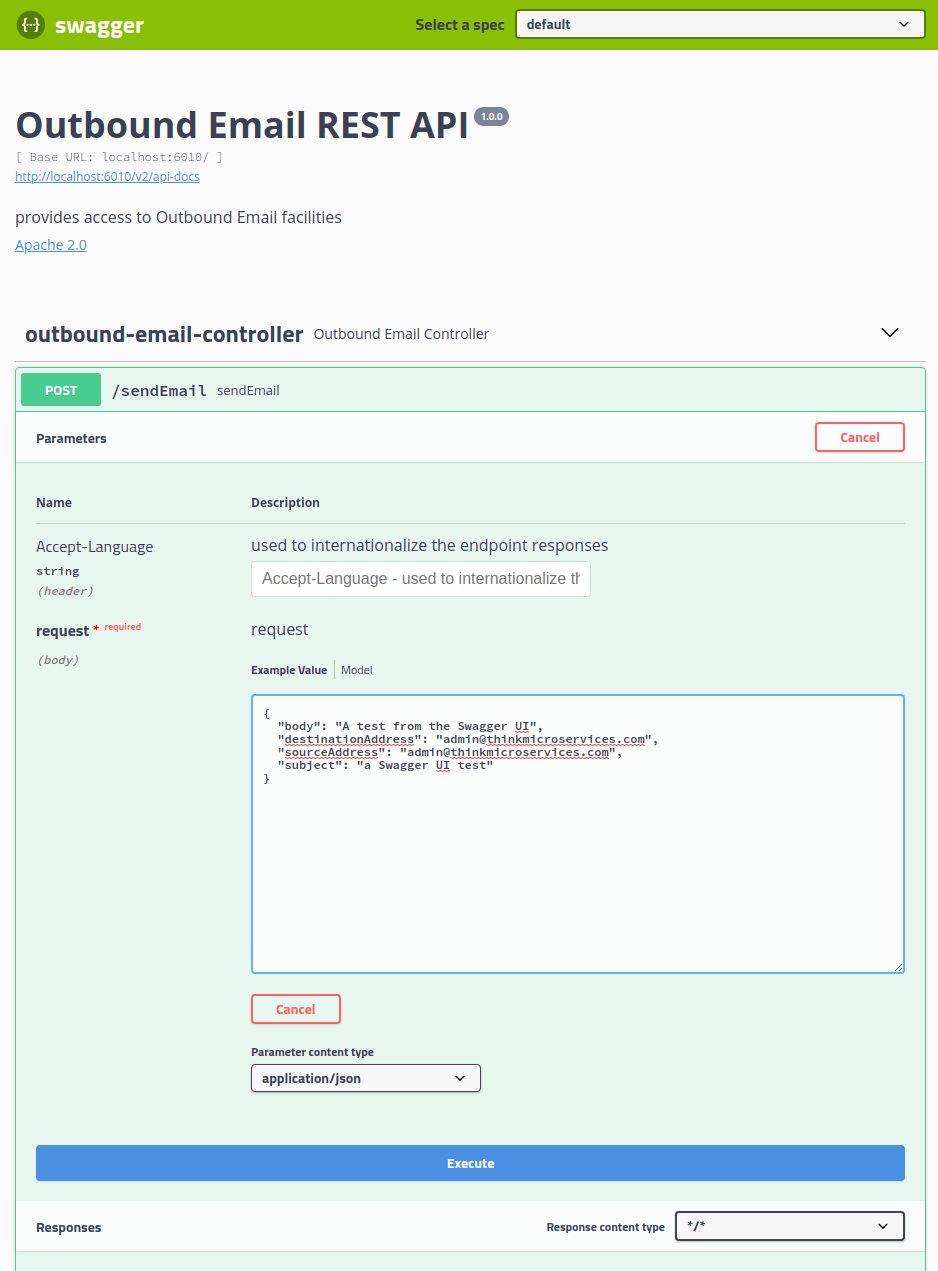
Now the interface will display input fields where we can enter our test data. In the request field you will see an editable JSON template, and we can modify the values to suit our needs. Once we have edited the parameters we can click the Execute button which will call the REST endpoint.
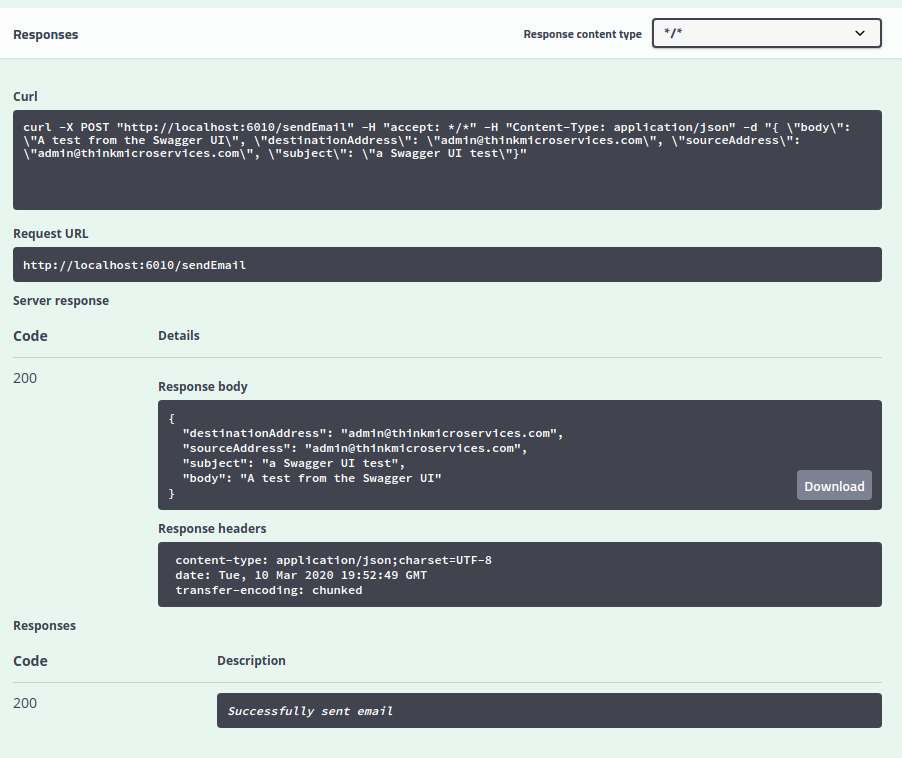
Here we can see the response from the method invocation. First, Swagger supplies you with the CURL command string as a convenience for those who prefer the command line or are building automated test scripts. Next we see the actual request URL. Finally we see the server response.
exercising from the message Listener from the RabbitMQ Web Admin console
Now that we have demonstrated the REST endpoint, we can turn our attention to the message-driven interface. Of course we have to ask how can we test a message consumer when we haven't built a message producer? As luck would have it, we actually have a way to send a message to our OutboundEmailService. When we deployed the RabbitMQ service container, we configured it to provide access to its web-based administration tool. In addition to monitoring the message broker, the administration tool provides a mechanism for us to enqueue messages. We start by opening a browser window and navigating to http://localhost:15672/.
We authenticate with the credentials we set in the application.yml or we pass in through our Docker-Compose file. The default username/password credentials for the reference implementation are think/microservices

Once you have entered your credentials you should see the RabbitMQ administration tool's Overview tab.
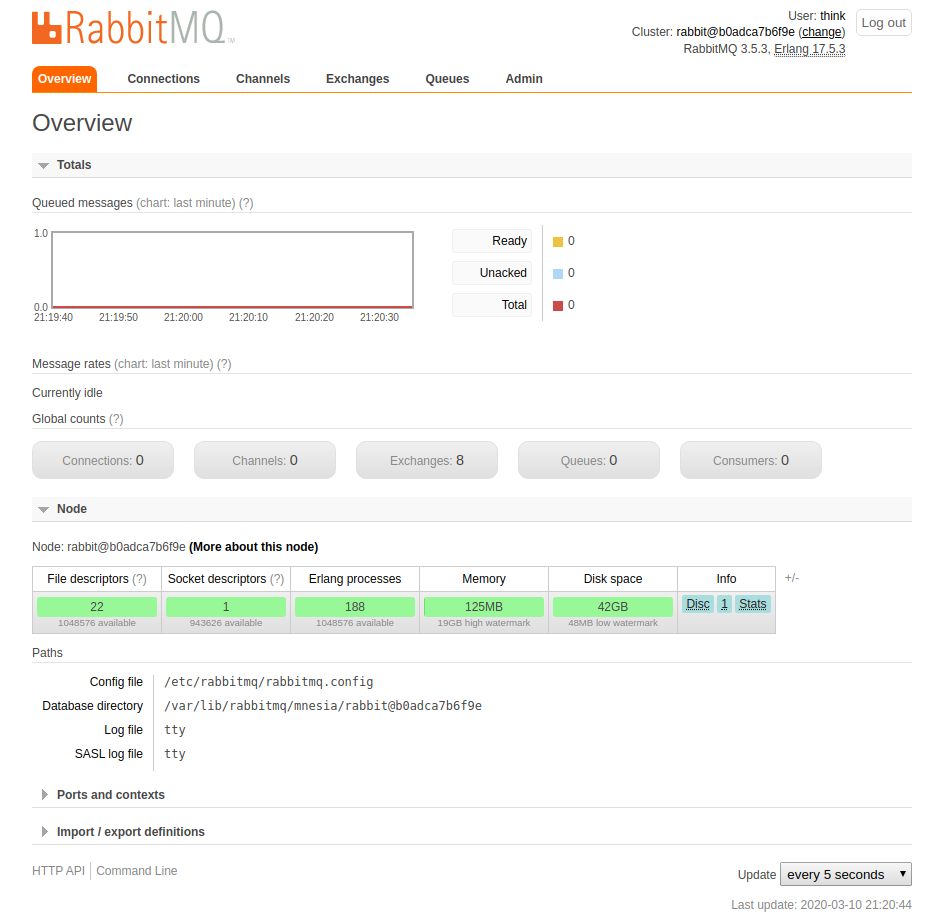
This tab provides the landing page for the administration tool. We won't stay here for long though. Click on the Queues tab.
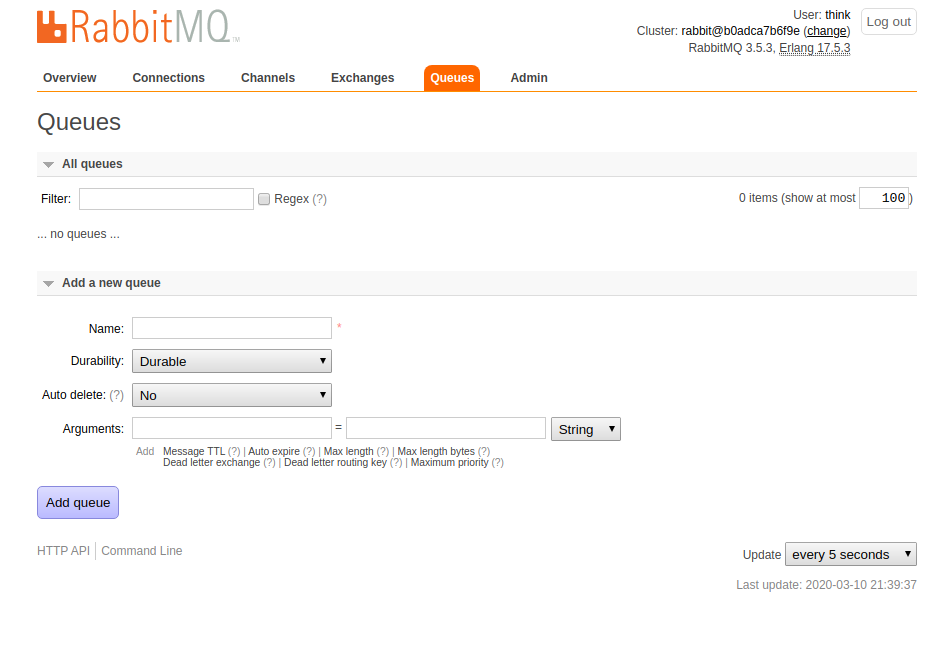
Unfortunately, since we don't have a message producer yet, we will have to create message queue manually.
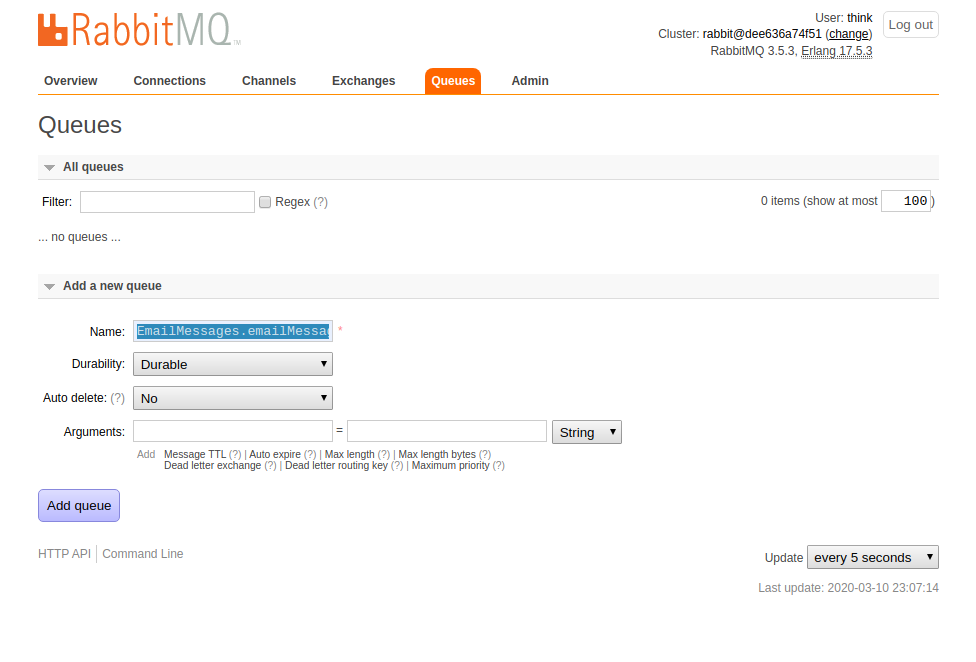
Fortunately, RabbitMQ makes this fairly trivial. We simply complete the Add a new queue form, entering EmailMessages.emailMessageGroup as the queue name, set Durability to Durable, and set Auto Delete to No, then press the Add Queue button.
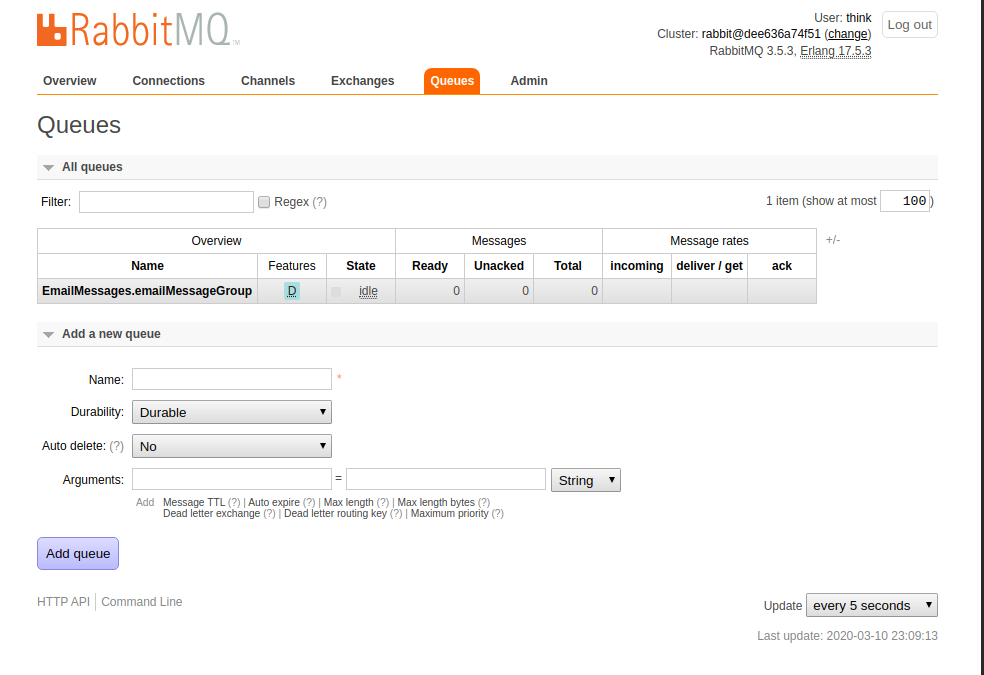
We now have a message queue that we can publish messages to, and our OutboundEmailService can consume from. Click on the EmailMessages.emailMessageGroup to view the queue details:
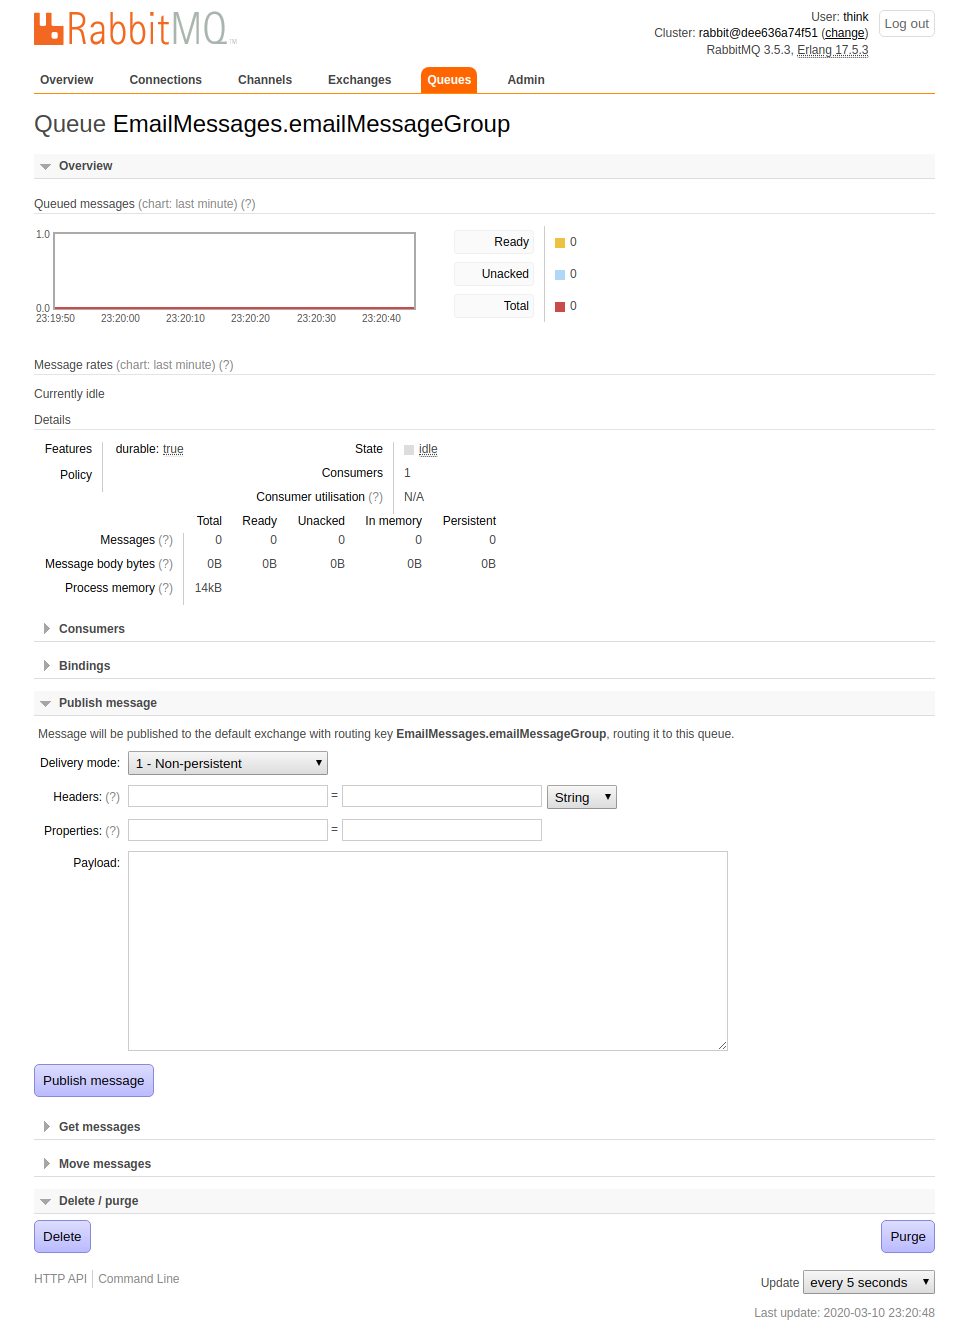
From this page we can monitor the queue's activity, and more importantly, publish a message. Select the Publish message option to display the input form:
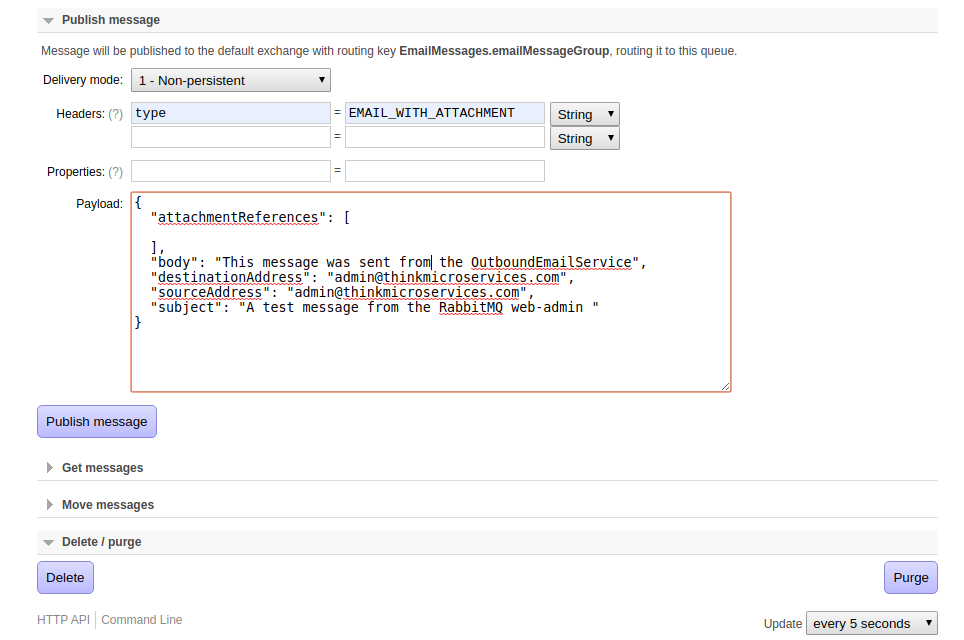
To publish a message to the queue:
- Set the Delivery mode to 1 - Non-persistent.
- Set the Header field to type and its value to EMAIL_WITH_ATTACHMENT
- Then set the Payload with the JSON message in the format:
{ "attachmentReferences": [ ], "body": "string", "destinationAddress": "string", "sourceAddress": "string", "subject": "string" } - Now press the Publish Message several times in quick succession to enqueue several email messages.
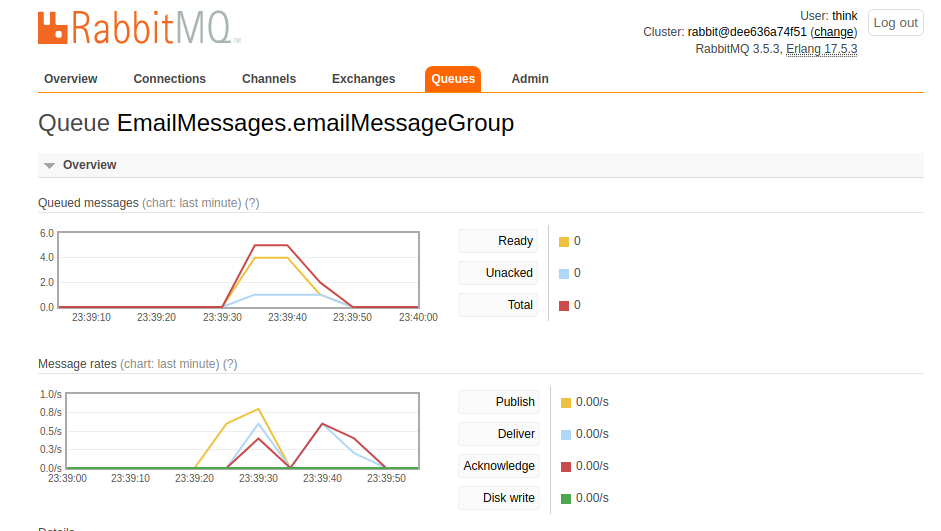
We can see in the charts above the number of messages queued and the message rates. We can infer from the Queued messages chart that the OutboundEmailService is consuming messages, once the queue message count starts to decrease. To must of course logon to the email client you sent the messages to, to confirm they were delivered.
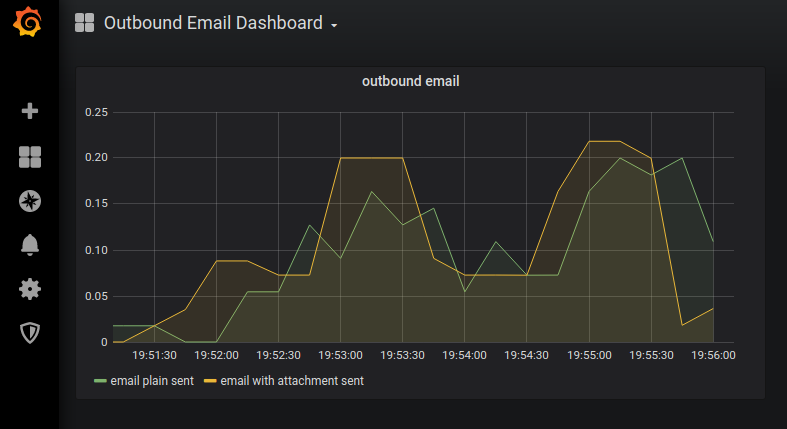
Metrics and Monitoring
The Outbound Email Service is the first service we will create that we will add additional our own service-level metrics to. We will be adding two metrics to this service:- outbound.email.send.plain.total
- outbound.email.send.attachment.total
To visualize this data we will import the OutboundEmailDashboard.json file from the ThinkMicroservices Github Dashboards repository. The dashboard should appear as:
Resources
- OutboundEmailService Github repository.
- OutboundEmailService Docker hub image.
- ThinkMicroservice OutboundEmailService Dashboard.
Coming Up
We covered a lot of ground for what is really a fairly trivial service. However, we have introduced many elements that will reappear in most of the reference implementations future services. While this article has been longer than most, the investment made here will allow us to avoid repeating these elements in future articles.Now that we have built our Outbound Email Service, we will build a similar service to allow our application to send ShortMessage Service (SMS) and Multimedia Messaging Service (MMS) text messages. In the next article, we will be creating the OutboundSmsService.

Twitter
Facebook
Reddit
LinkedIn
Email