
"The film vault" by Sean_Marshall is licensed under CC BY-NC 2.0![]()
![]()
![]()
Introduction
In the previous article ( Authentication Service Part III), we completed the discussion of the AuthenticationService implementation and we now have a working AuthenticationService. In this fourth and final article, we will start by updating the API Gateway's routing configuration to include the AuthenticationService. Next we will update our Docker-Compose yml file to include the AuthenticationService, and finish by exercising the service's Swagger web UI.Requirements
Before you get started, you will need the following:- Java
- Maven
- Docker
- Docker-Compose
UPDATES TO THE API GATEWAY
Once we have the AuthenticationService running we will want to connect it to the API gateway. To accomplish this we will edit the API Gateway's application.yml file to include the routing configuration:
  routes:

    - id: authentication
      uri: lb://AZN-SERVICE
      predicates:
        - Path= /api/authentication/**
      filters:
        - RewritePath=/api/authentication/(?

   .*), /$\{segment}

        - name: Hystrix
          args:
            name: HystrixAuthenticationFallback
            fallbackUri: forward:/fallback/authentication
- id- we set the id to authentication.
- uri- we use the URI to lb://AZN-SERVICE. This instructs the API gateway to route the calls to an AuthorizationService registered with the DiscoveryService. This allows us to include multiple instances of the AuthenticationService if necessary.
- predicates- we declare a single path /api/authentication/**. This will serve as the external API root path for all AuthenticationService methods.
- filters- we will declare a RewritePath filter that will map the API Gateway's AuthenticationService methods prefixed with /api/authentication to the root path / of the target service.
Docker-Compose
We continue the practice of enhancing the previous Docker-Compose file to include the AuthenticationService configuration.loading...Here we configure the service to map to port 7777. We also configuration a number of environment variables that will override the default configuration parameters. This allows us to customize the service's configuration for this deployment.
Authentication Service in Action
We can copy the Docker-Compose file above to your local machine, and run it from the command prompt:docker-compose -f ./dc-08-authentication.yml up -d
Once all the services have started, Point a web browser to http://localhost:7777/swagger-ui.html.
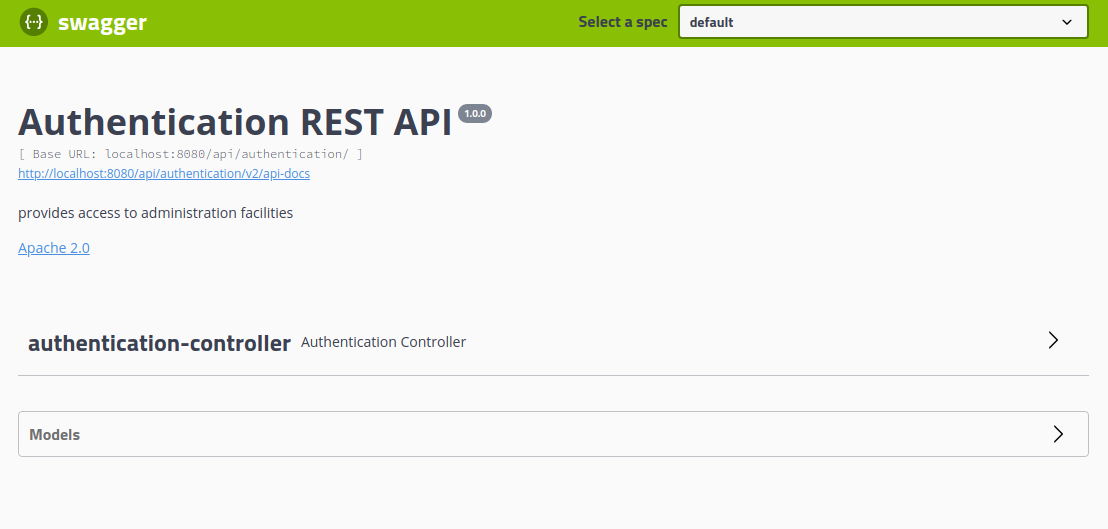
Exercising the service with Swagger web ui client
If we click on the authentication-controller option in our Swagger web client, we can view the listing of our services methods.
In this article, we will only exercise the unsecured methods and those requiring User roles. We will save the administrative features for when we build our AdministrationService.
Register User
We will start by registering a user. To do this, click the /register option. It will expand to display the following form: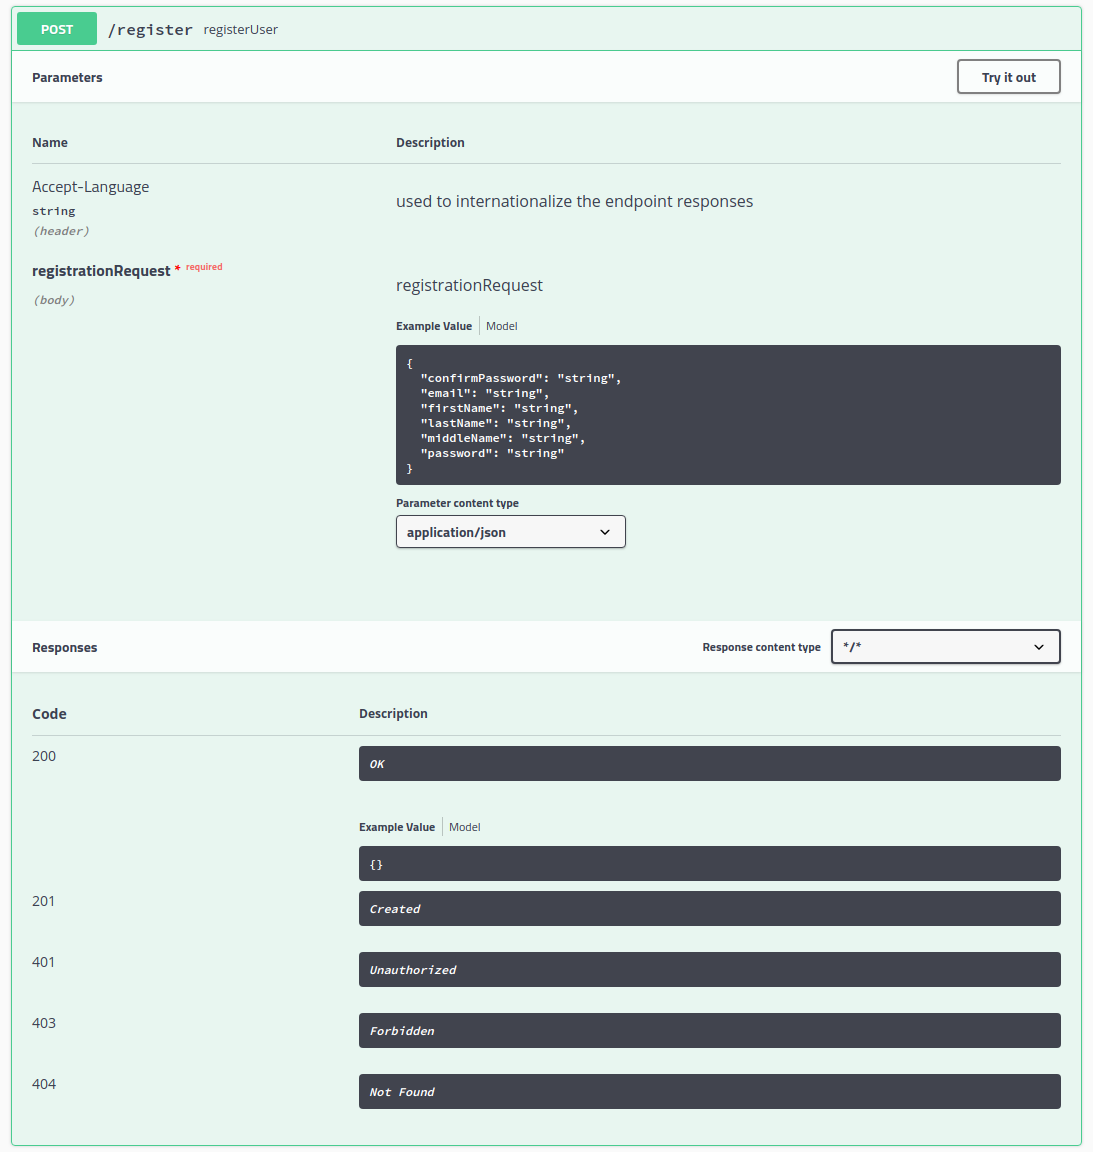

Here we supply the new user's first name, middle name,last name, email address, password & confirmation password and click Execute.
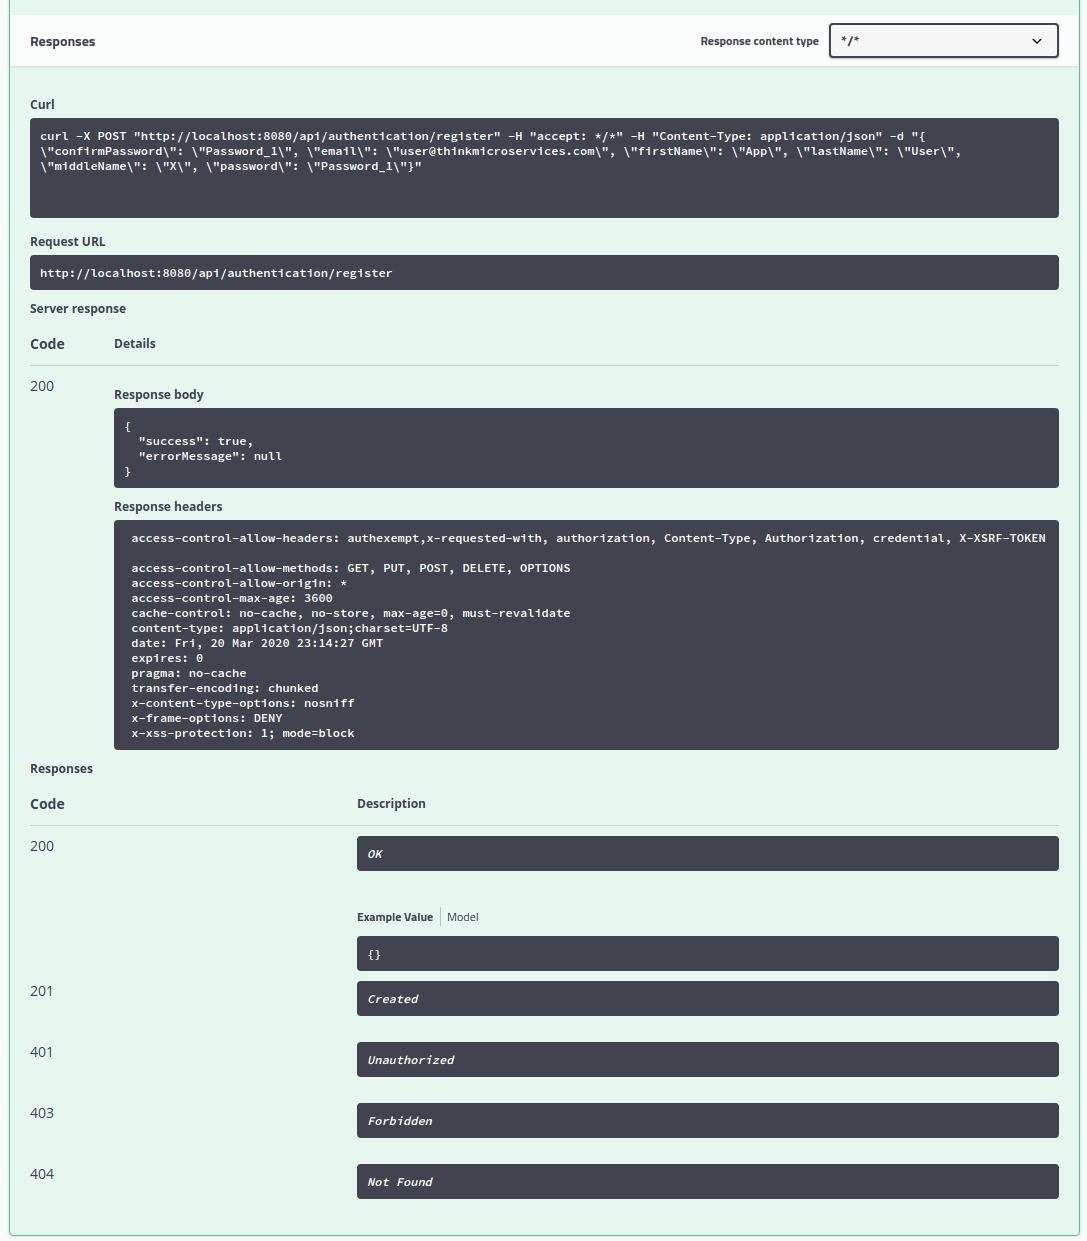
The response body JSON contains "success": true indicating that the registration succeeded.
Authenticate User
No that we have created a new user, we can call the /authenticate method with the credentials we supplied for registration.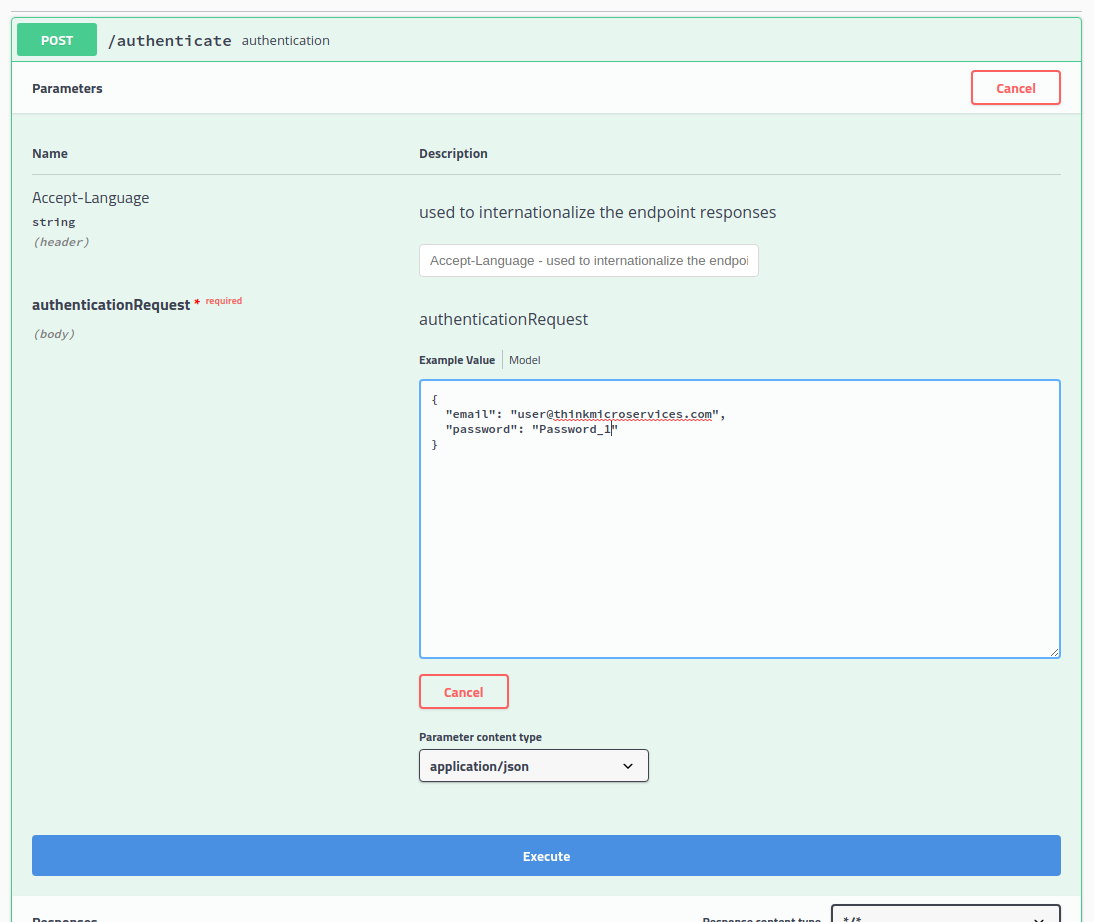
After clicking the Execute button, check the Responses section.
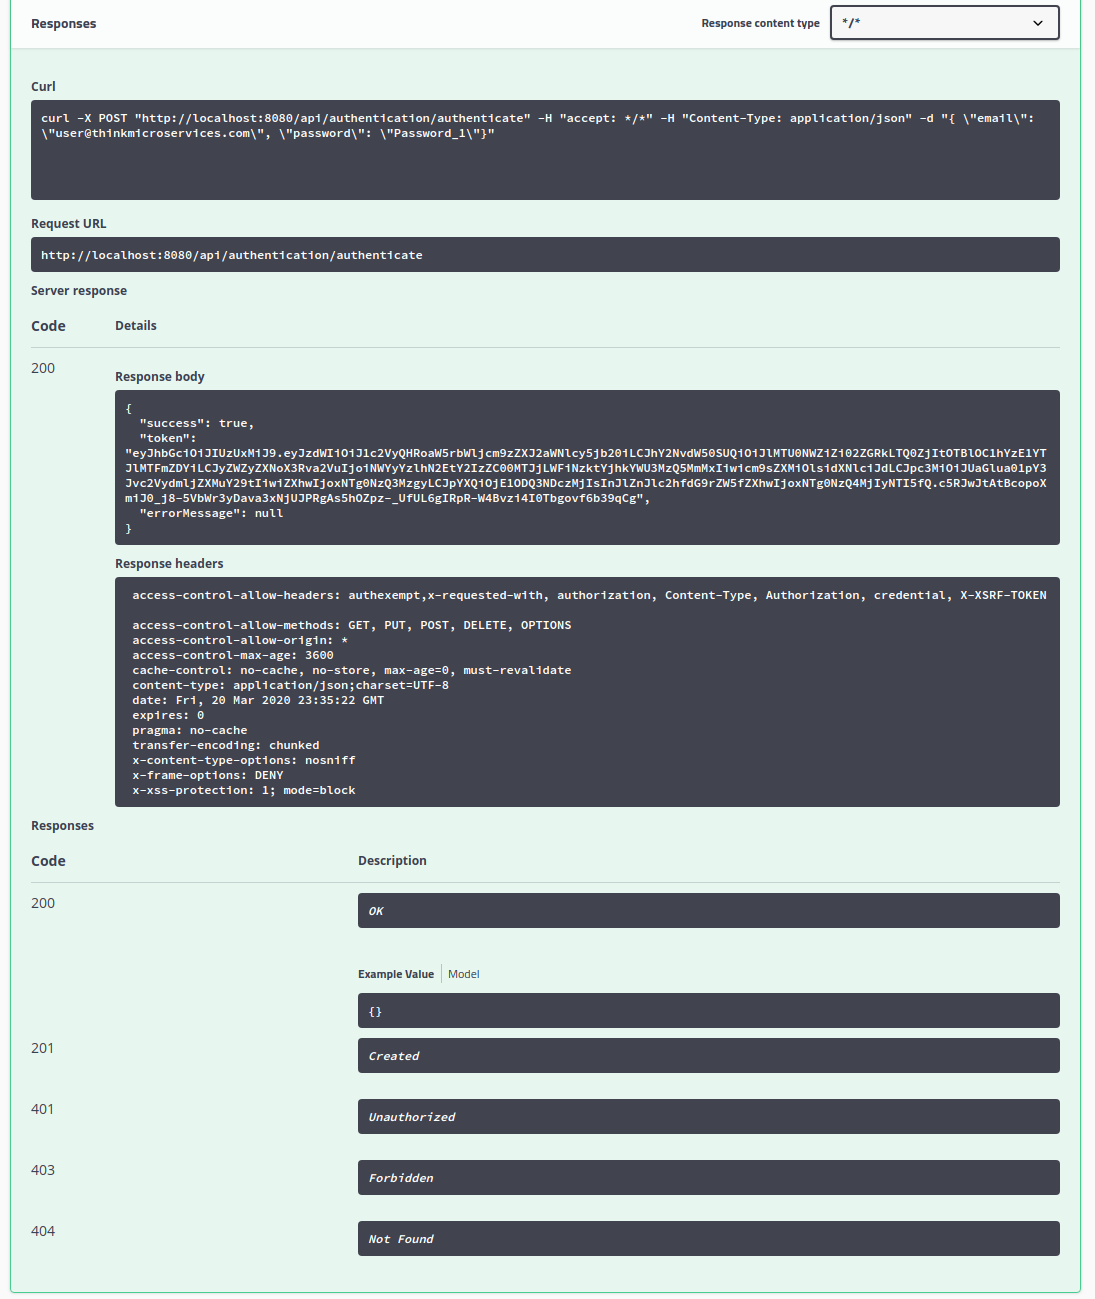
The response body JSON contains "success": true indicating that the authentication succeeded and "token": with a value of :
"eyJhbGciOiJIUzUxMiJ9.eyJzdWIiOiJ1c2VyQHRoaW5rbWljcm9zZXJ2aWNlcy5jb20iLCJhY2NvdW50SUQiOiJlMTU0NWZiZi02ZGRkLTQ0ZjItOTBlOC1hYzE1YTJ lMTFmZDYiLCJyZWZyZXNoX3Rva2VuIjoiNWYyYzlhN2EtY2IzZC00MTJjLWFiNzktYjhkYWU3MzQ5MmMxIiwicm9sZXMiOlsidXNlciJdLCJpc3MiOiJUaGlua01pY3Jvc2VydmljZXMuY29tIiwiZXhwIjoxNTg0NzQ3MzgyLCJpYXQiOjE1ODQ3NDczMjIsInJlZnJlc2hfdG9rZW5fZXhwIjoxNTg0NzQ4MjIyNTI5fQ.c5RJwJtAtBcopoXmiJ0_j8-5VbWr3yDava3xNjUJPRgAs5hOZpz-_UfUL6gIRpR-W4Bvzi4I0Tbgovf6b39qCg" which is the JWT we will supply to our methods requiring authentication.
Note: Since our tokens are short lived, you will likely need to re-authenticate to generate a new token for each of the secured methods. You can decode your JWT tokens with the
jwt.io debugger. Simply copy the JWT into the
Encoded text area, and tick the
secret base64 encoded checkbox in the
Verify Signature section.
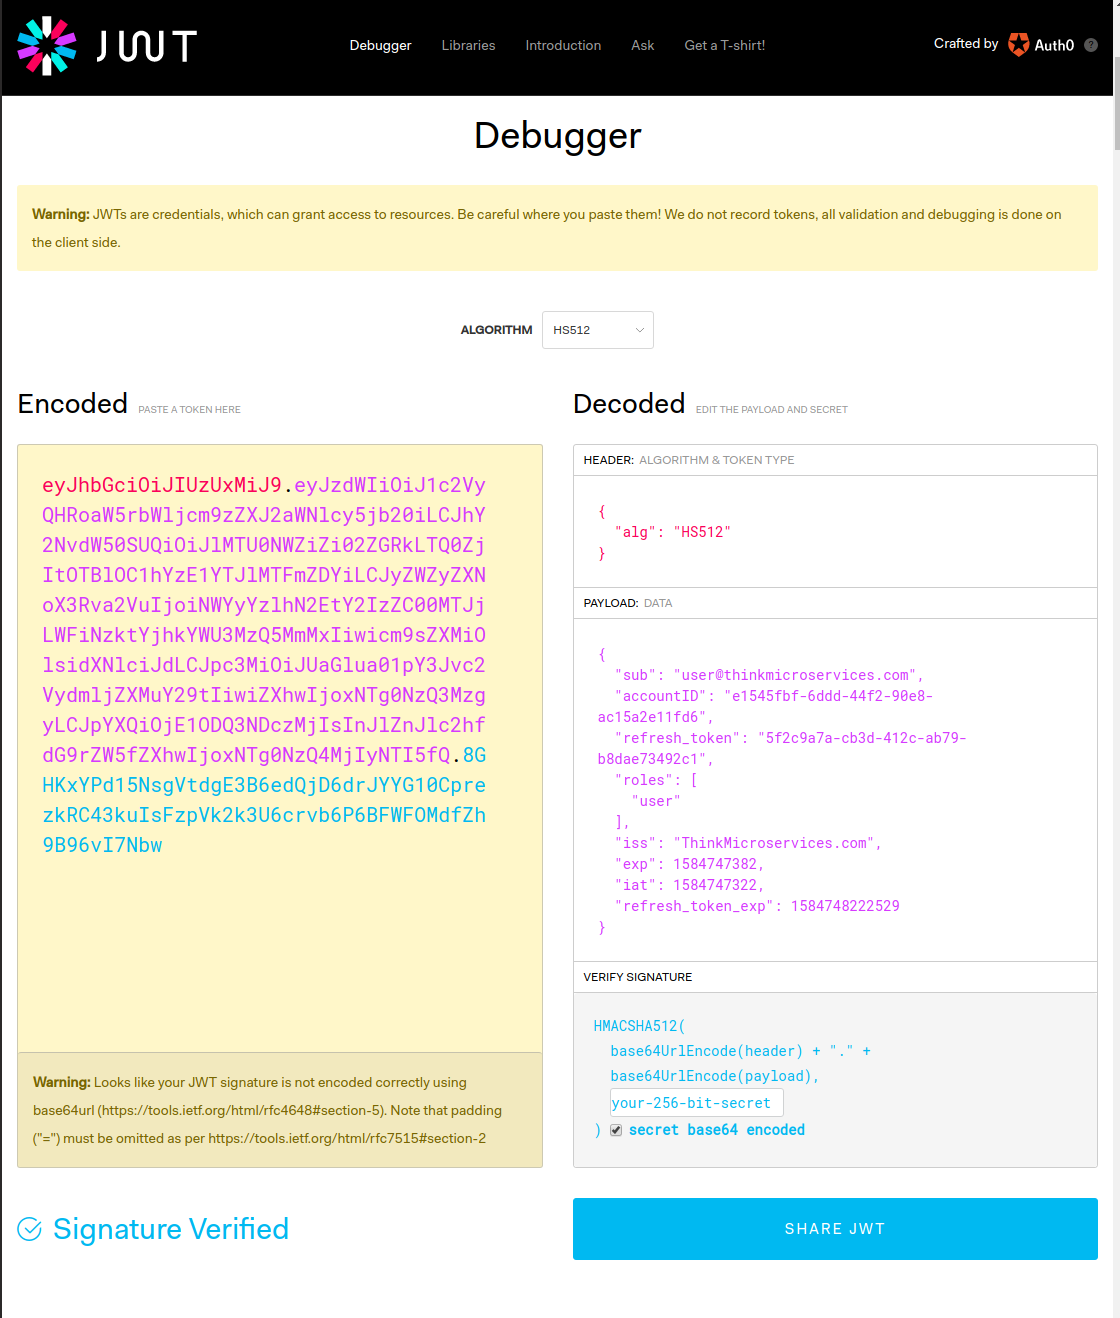
Here we can inspect the decoded header and payload of the JWT.
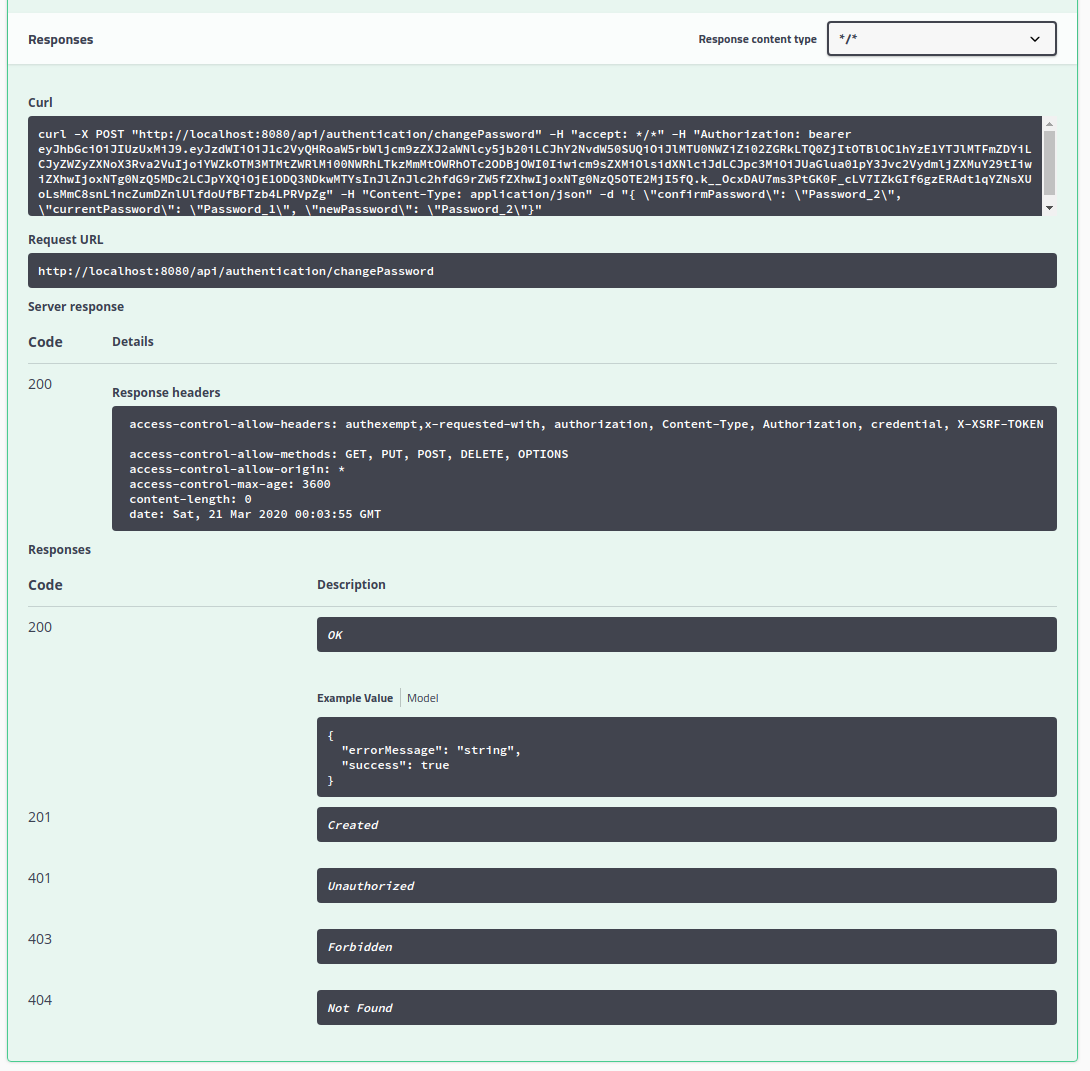
Change User Password
Now that we have authenticated with our registered credentials, we will change our credentials password. To do this, click on the /changePassword option.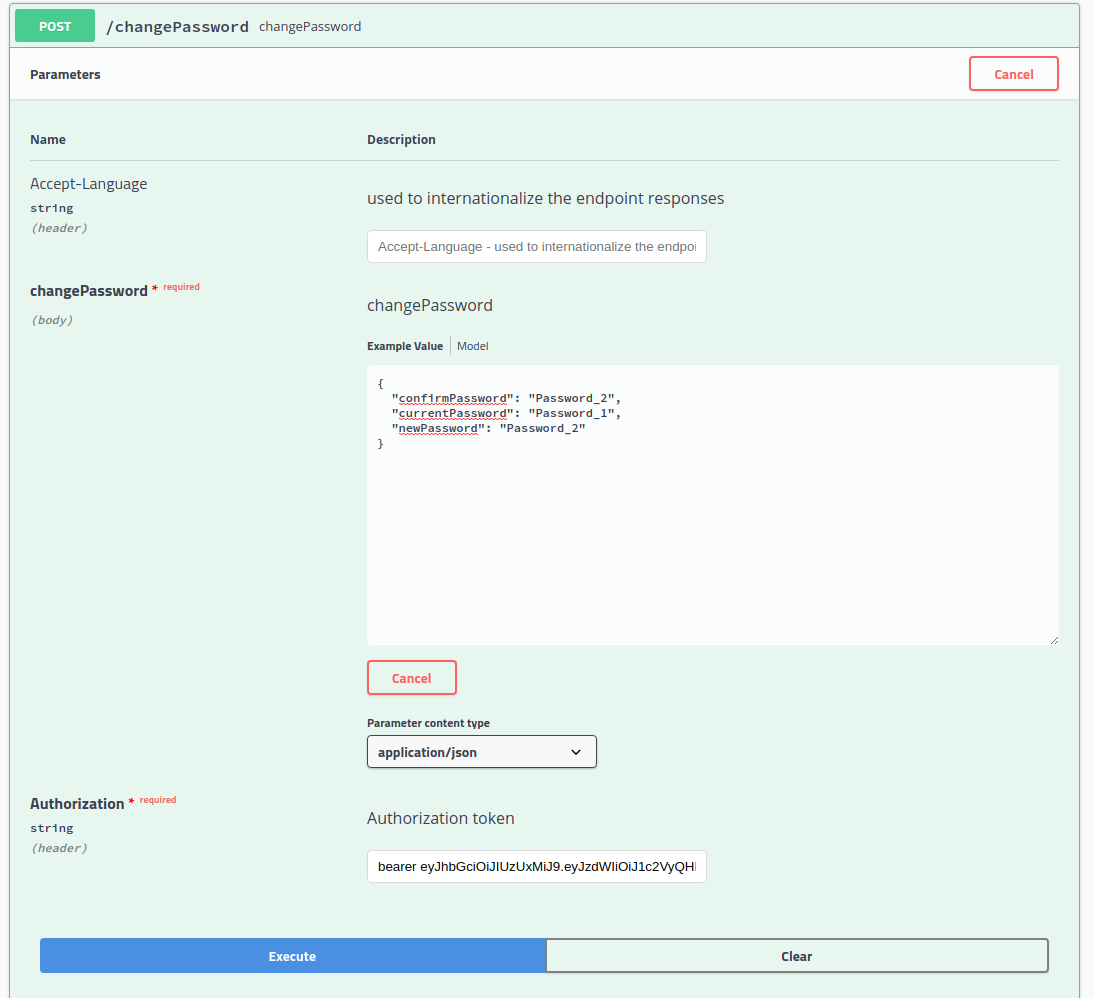
We supply the current password, the new password, and the confirmation password values in the request body JSON. We have another field we need to supply as well:

The Authorization section contains a field for the Authorization Token. This field allows us to set HTTP Authorization header. The value of this field must begin with bearer a space, and a valid JWT generated by the ./authenticate method. When these fields have been set, click the Execute button.
Request Password Recovery Code
The /changePassword method requires that we know our current password. If we have forgotten our password, we can use the /recoverPassword method to send a recovery code via email.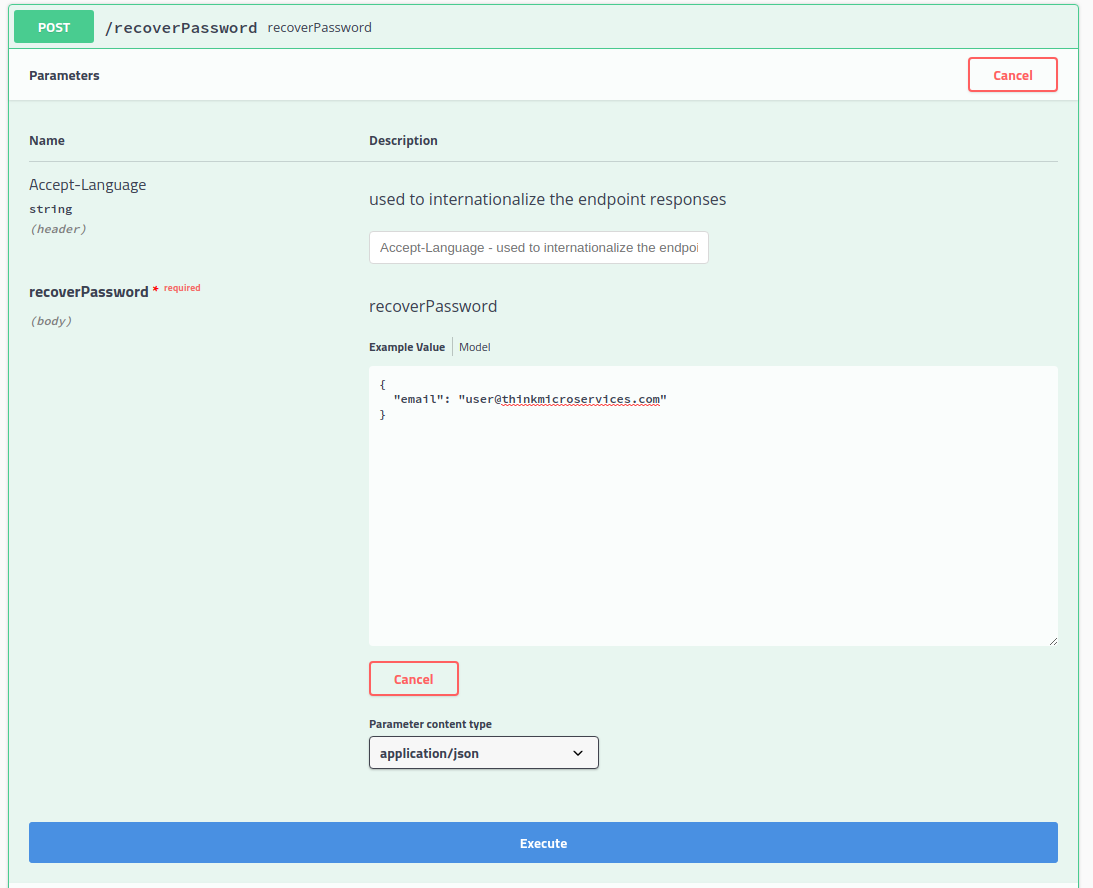
If the email supplied corresponds to an existing account, the user will receive an email containing a recovery code similar to this:
2e752dcf-5cf8-46b3-a786-2a9a09b43d9e
We will use this recovery code in the next method to change our password.
Change Password with Recovery Code
We will use the previously received recovery code, along with the account email address, the new password, and the confirmation password.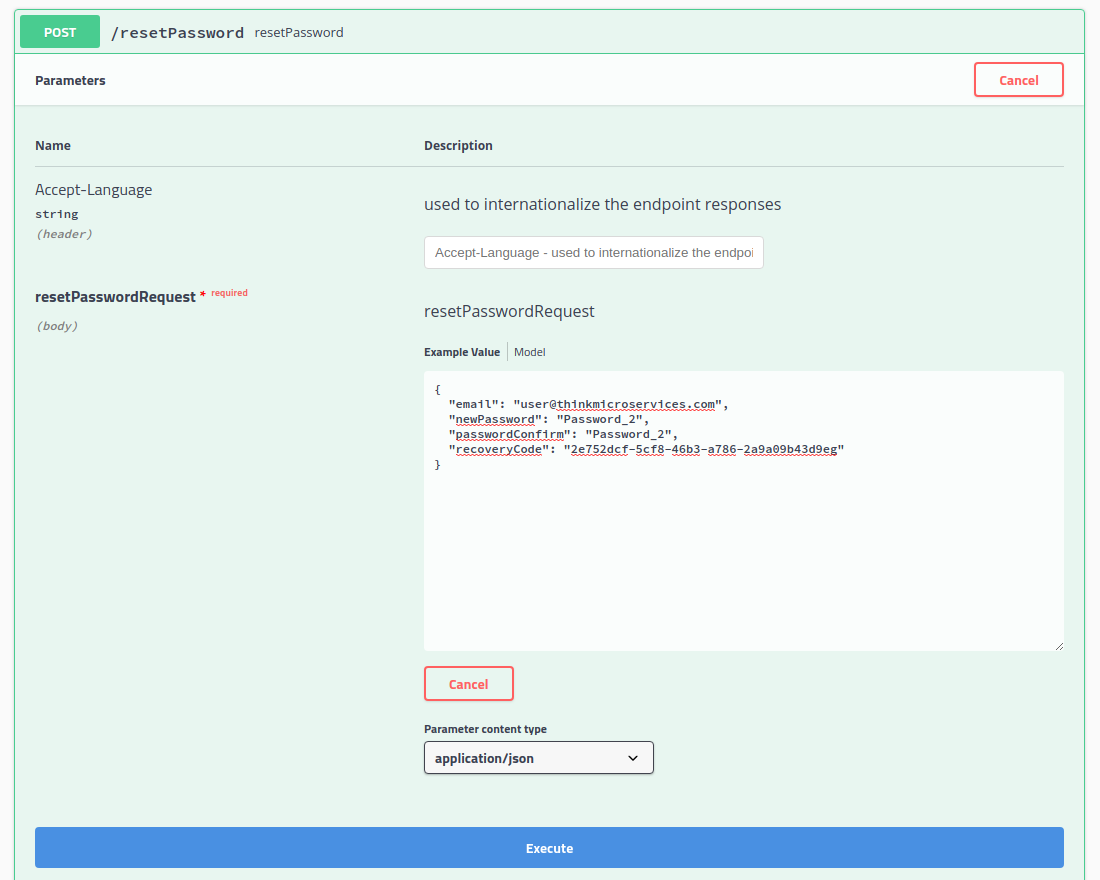
Metrics and Monitoring
The Authentication Service generates the following service-level metrics:- registration.new.total
- authentication.successful..total
- authentication.failure.total
- password.changed.total
- password.recovered.total
To visualize this data we will import the AuthenticationDashboard.json file from the ThinkMicroservices Github Dashboards repository. The dashboard should appear as:

Resources
- AuthenticationService Github repository
- AuthenticationService Docker hub image.
- ThinkMicroservice AuthenticationService Dashboard.

Twitter
Facebook
Reddit
LinkedIn
Email